
PhotoRefine is a next-generation technology app that employs artificial intelligence (AI) to vastly reduce the amount of time photographers typically spend grouping, rating, and culling photos after a photo session. With PhotoRefine, you will no longer have to worry about editing duplicate photos or spending the time trying to determine which similar photos are more in focus than another.
Here is a brief overview of using PhotoRefine:
- Download Application
- Logging In / First Import
- Viewing Photos
- Adjusting Workflows
- Edit and Upload
- Creating a New Import
Downloading PhotoRefine
PhotoRefine is included with the ProSuite plan. For all lower plan levels, try it for free within the first 30 days of your Zenfolio account. Download links in your account are HERE or you can download the application directly here:
|
Requires Apple's Rosetta 2.
|
Requires Windows 10 v2004
|
If you'd like to access the PhotoRefine application download through your account, follow these steps:
- Click on the
 Add-ons & Tools icon.
 - Go to the Tools tab.
- Here you will see the different applications that Zenfolio offers, locate PhotoRefine, and choose your download for Windows or Mac.

First Time Using PhotoRefine
The culling workflow recognizes similar photos, and groups them together based on variety of conditions like content, capture time, and exposure bracketing. The best photo of each group is tagged with the highest rating according to the sharpness, exposure, facial expression, eyes open, and basic composition relative to other photos in the group.
|
Before we get started, let's establish a few keywords that will be used in the application: Auto Group will group and stack photos based on content similarity with limits based on time difference and bracketed shots. Auto Rate analyzes each photo according to a set of parameters like focus, expression, eyes open, etc. and determines the best photo for each group with star ratings and color labels. Workflow contains an Auto Group profile and an Auto Rate profile for auto processing of photos. |
- The first time you use PhotoRefine, you will need to log into your existing Zenfolio account. If you have not already downloaded the application to your computer, you will need to first do that HERE.
- After logging in, click on Browse Desktop to locate your photos, or drag your files into the application.
- Choose a pre-defined Workflow that you’d like to use on the imported photos. Or you can turn the AI Analysis OFF to allow the photos to be analyzed according to no particular Workflow.
- There are six provided Workflows: Wedding, Portrait, Event, Sports-Action, Sports-T&I, and Landscape. The Workflow will determine the parameters with which the photos will be analyzed.
- Click Import. Once the photos have been imported, they will automatically begin analysis to determine Groups and Ratings.

As the import progresses, PhotoRefine will analyze each photo and compare them to similar photos. Once the import and analysis is complete, you will be left with groups of photos, with the best photo selected from each group.
Getting Started With the PhotoRefine Interface
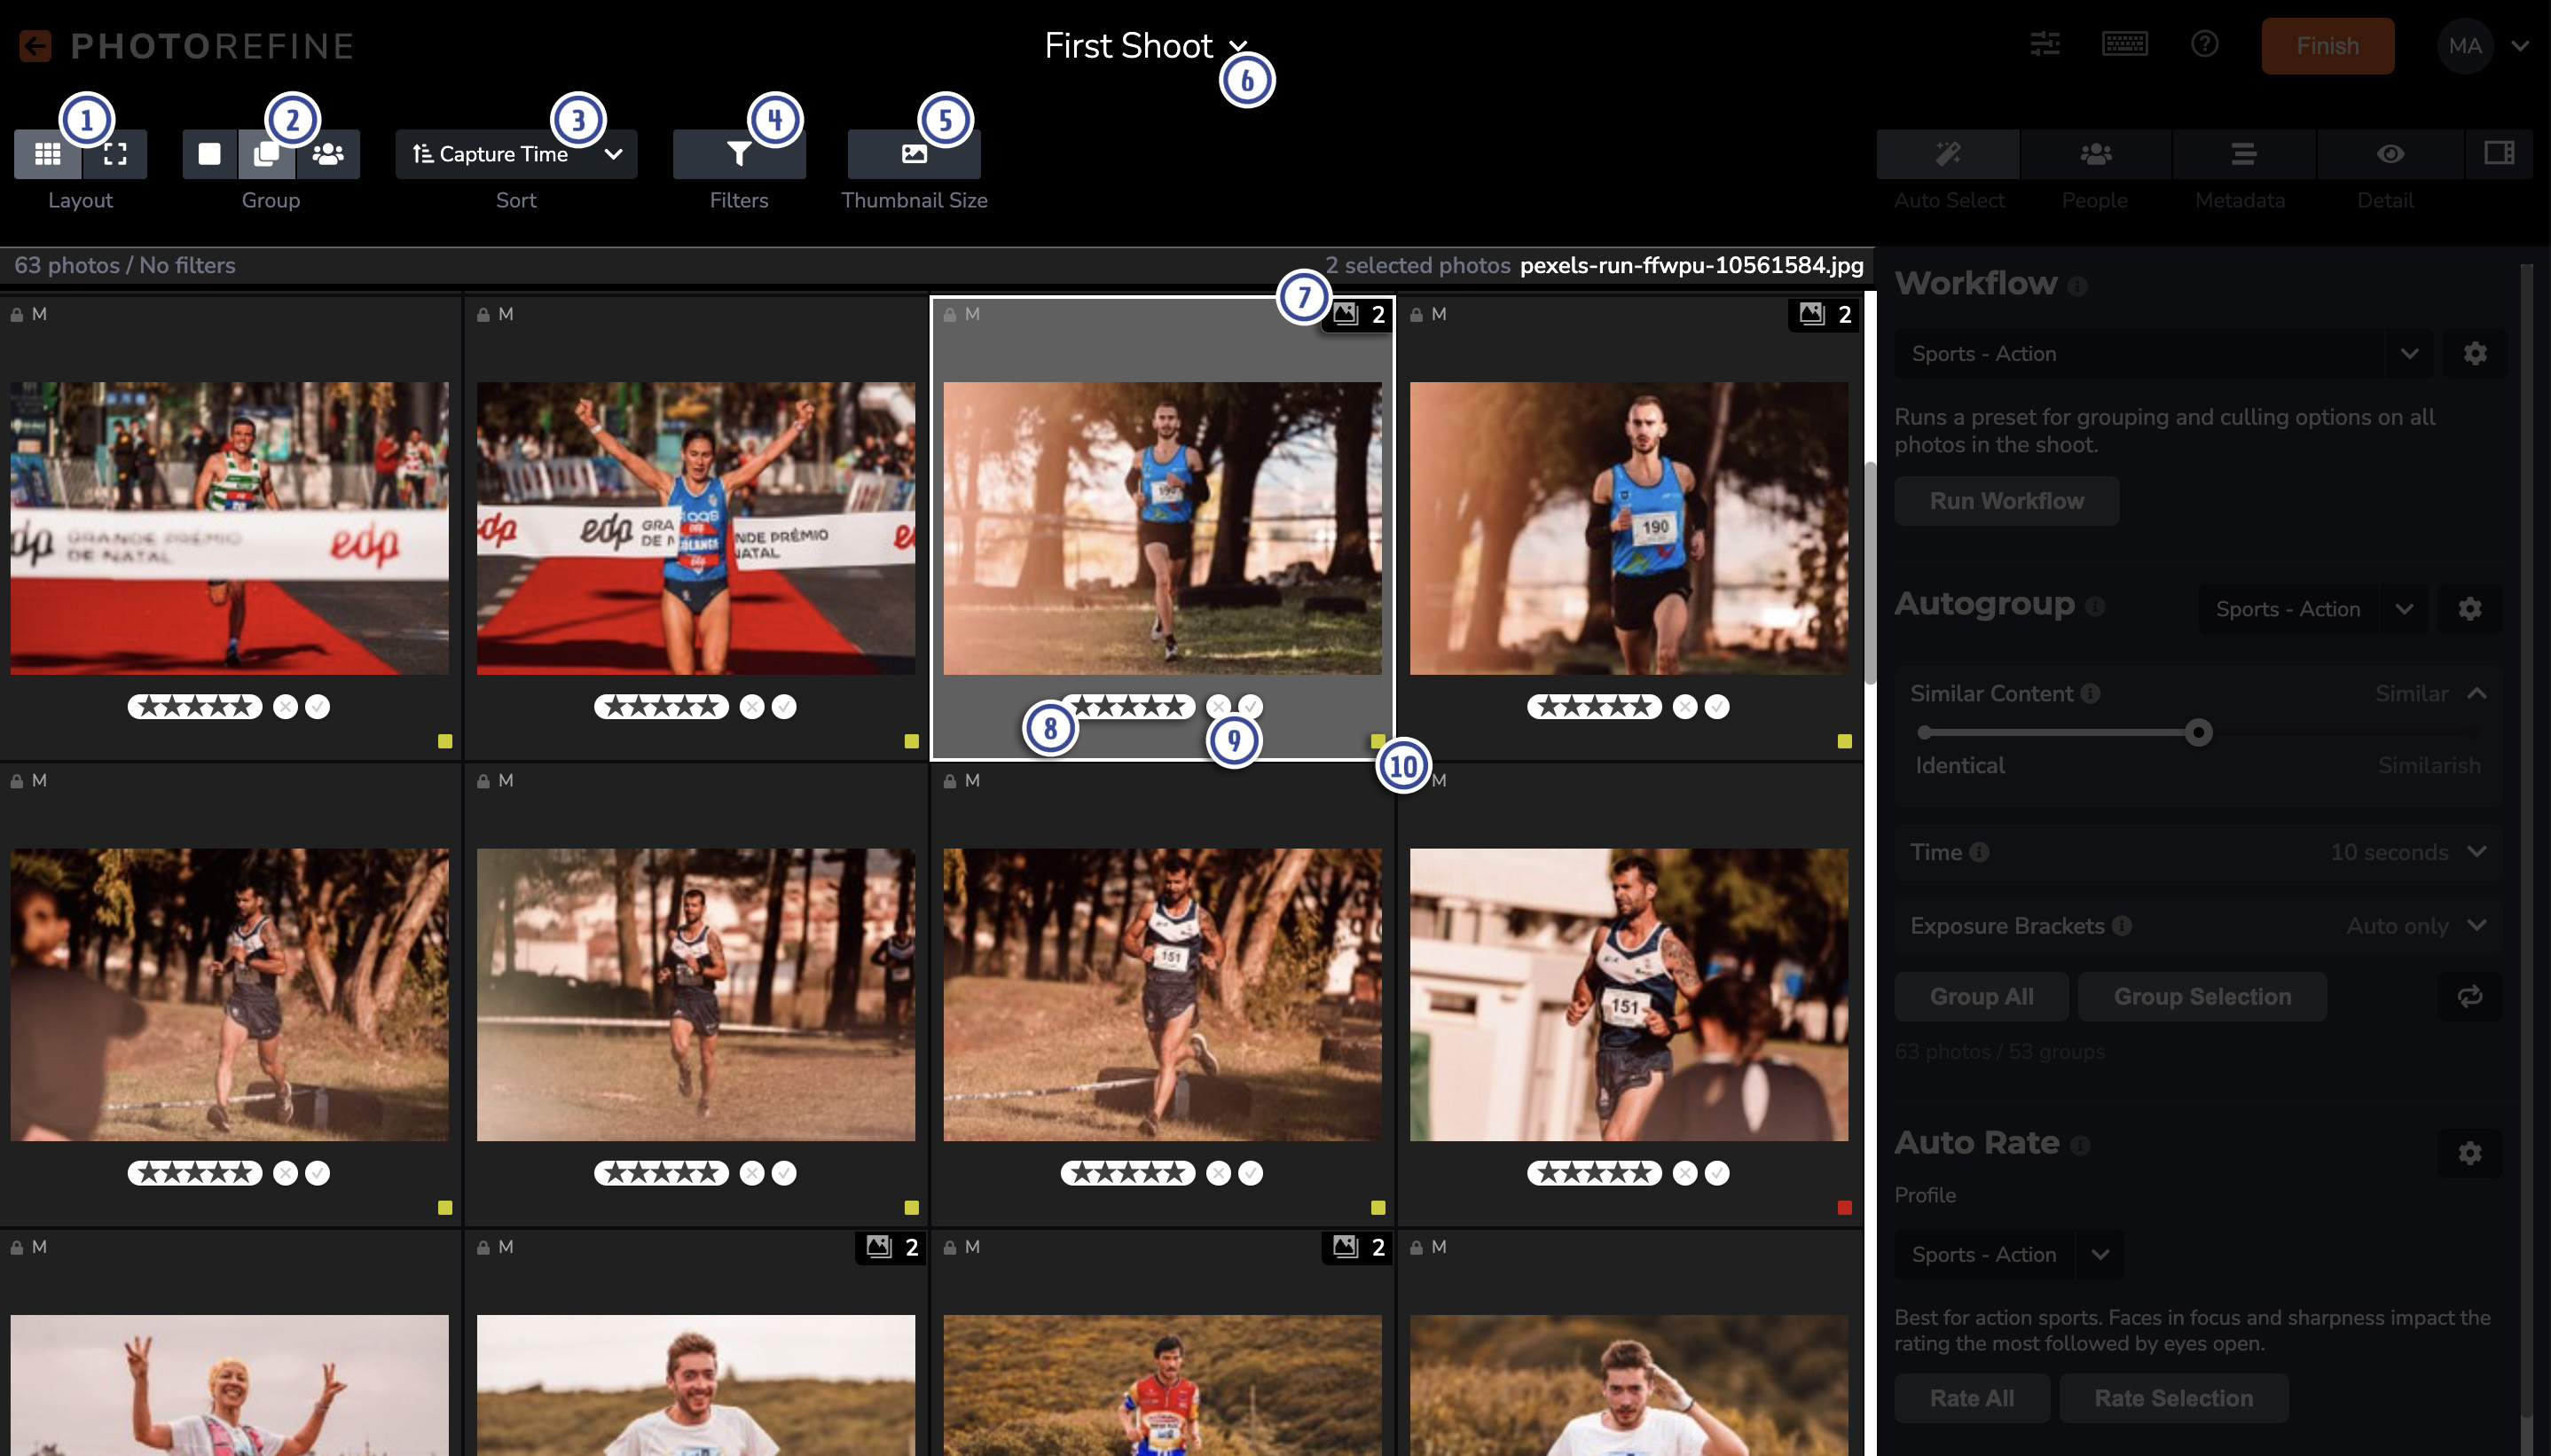
At the very top of the PhotoRefine screen, there are a variety of buttons and options available to explore.

- In the very top-left corner, you can click on the PhotoRefine logo to go back to the list of all your imported shoots in the application.
- In the top-center, you will see the title of the shoot you're currently viewing. Clicking on this will allow you to:
- Quickly switch between shoots you've already imported.
- You can also use Back to all shoots to return to the main list of all imported shoots.
- The Preferences will allow you to determine some overall settings for the operation of PhotoRefine overall. See more about the Preferences HERE.
- The Keyboard Shortcuts icon will show/hide all of the available keyboard shortcuts that can be used within PhotoRefine.
- Use the ? icon to link to this support article for help.
- Clicking on Finish will indicate that you are finished culling through the photos in this shoot and all of the information gathered will be updated on the files themselves.
- The last option is your profile, allowing you to jump to your Zenfolio account or log out of PhotoRefine.
Viewing The Photos
Once your photos have been imported, analyzed, and grouped, you will be able to look through them and see all of the culling that has taken place.
The majority of the screen will be comprised of the photos and options of how to view/sort them.
- Layout will allow you to switch between a Grid view and Focused view of the individual selected photo/group.
- Group will allow you to see each individual photo separately, only the best photo of each group, or the faces detected by facial recognition.
- Sort allows you to choose what criteria is used to sort the photos. For example, if you wanted to sort the photos in descending order by the time the photos were captured, you can do that.
- Filter will allow you to narrow down the photos you're seeing. For example, if you only wanted to view the photos that have been rated with a Green color tag, you can do that.
- Thumbnail Size will allow you to adjust the size of the thumbnails being displayed.
- If you've uploaded different shoots, you can click on the title of the shoot at the top center of the screen and select a different shoot. Or you can go back to a view of all your shoots, where you can also import a new shoot.
- Looking at the photos themselves, you can see how many similar photos have been grouped together by looking for the Group indicator in the top right-hand corner of the thumbnail.
- Star Rating will allow you to see what photos have been detected as the best out of similar grouped photos. If photos have been grouped together, you'll only see the best rated photo of the group when in the grouped view.
- Picked and Not Picked will allow you to easily pick what photos you like the best. Picking a photo will allow you to sort by picked photos in the future.
- Color Labels allow you to further provide a filtering/sorting option for your photos. The Auto Rate profiles of a Workflow will label photos red, yellow, or green based on a selected criteria; however, there are additional colors that you can use for any purpose.
Adjusting Workflows
On the right-hand side of the PhotoRefine window, you'll find some more details regarding the analysis of the photos. These are the parameters that have been used to analyze and group all of the photos that have been imported. However, you can adjust these parameters at any time to further customize the culling of the photos.
Auto Select
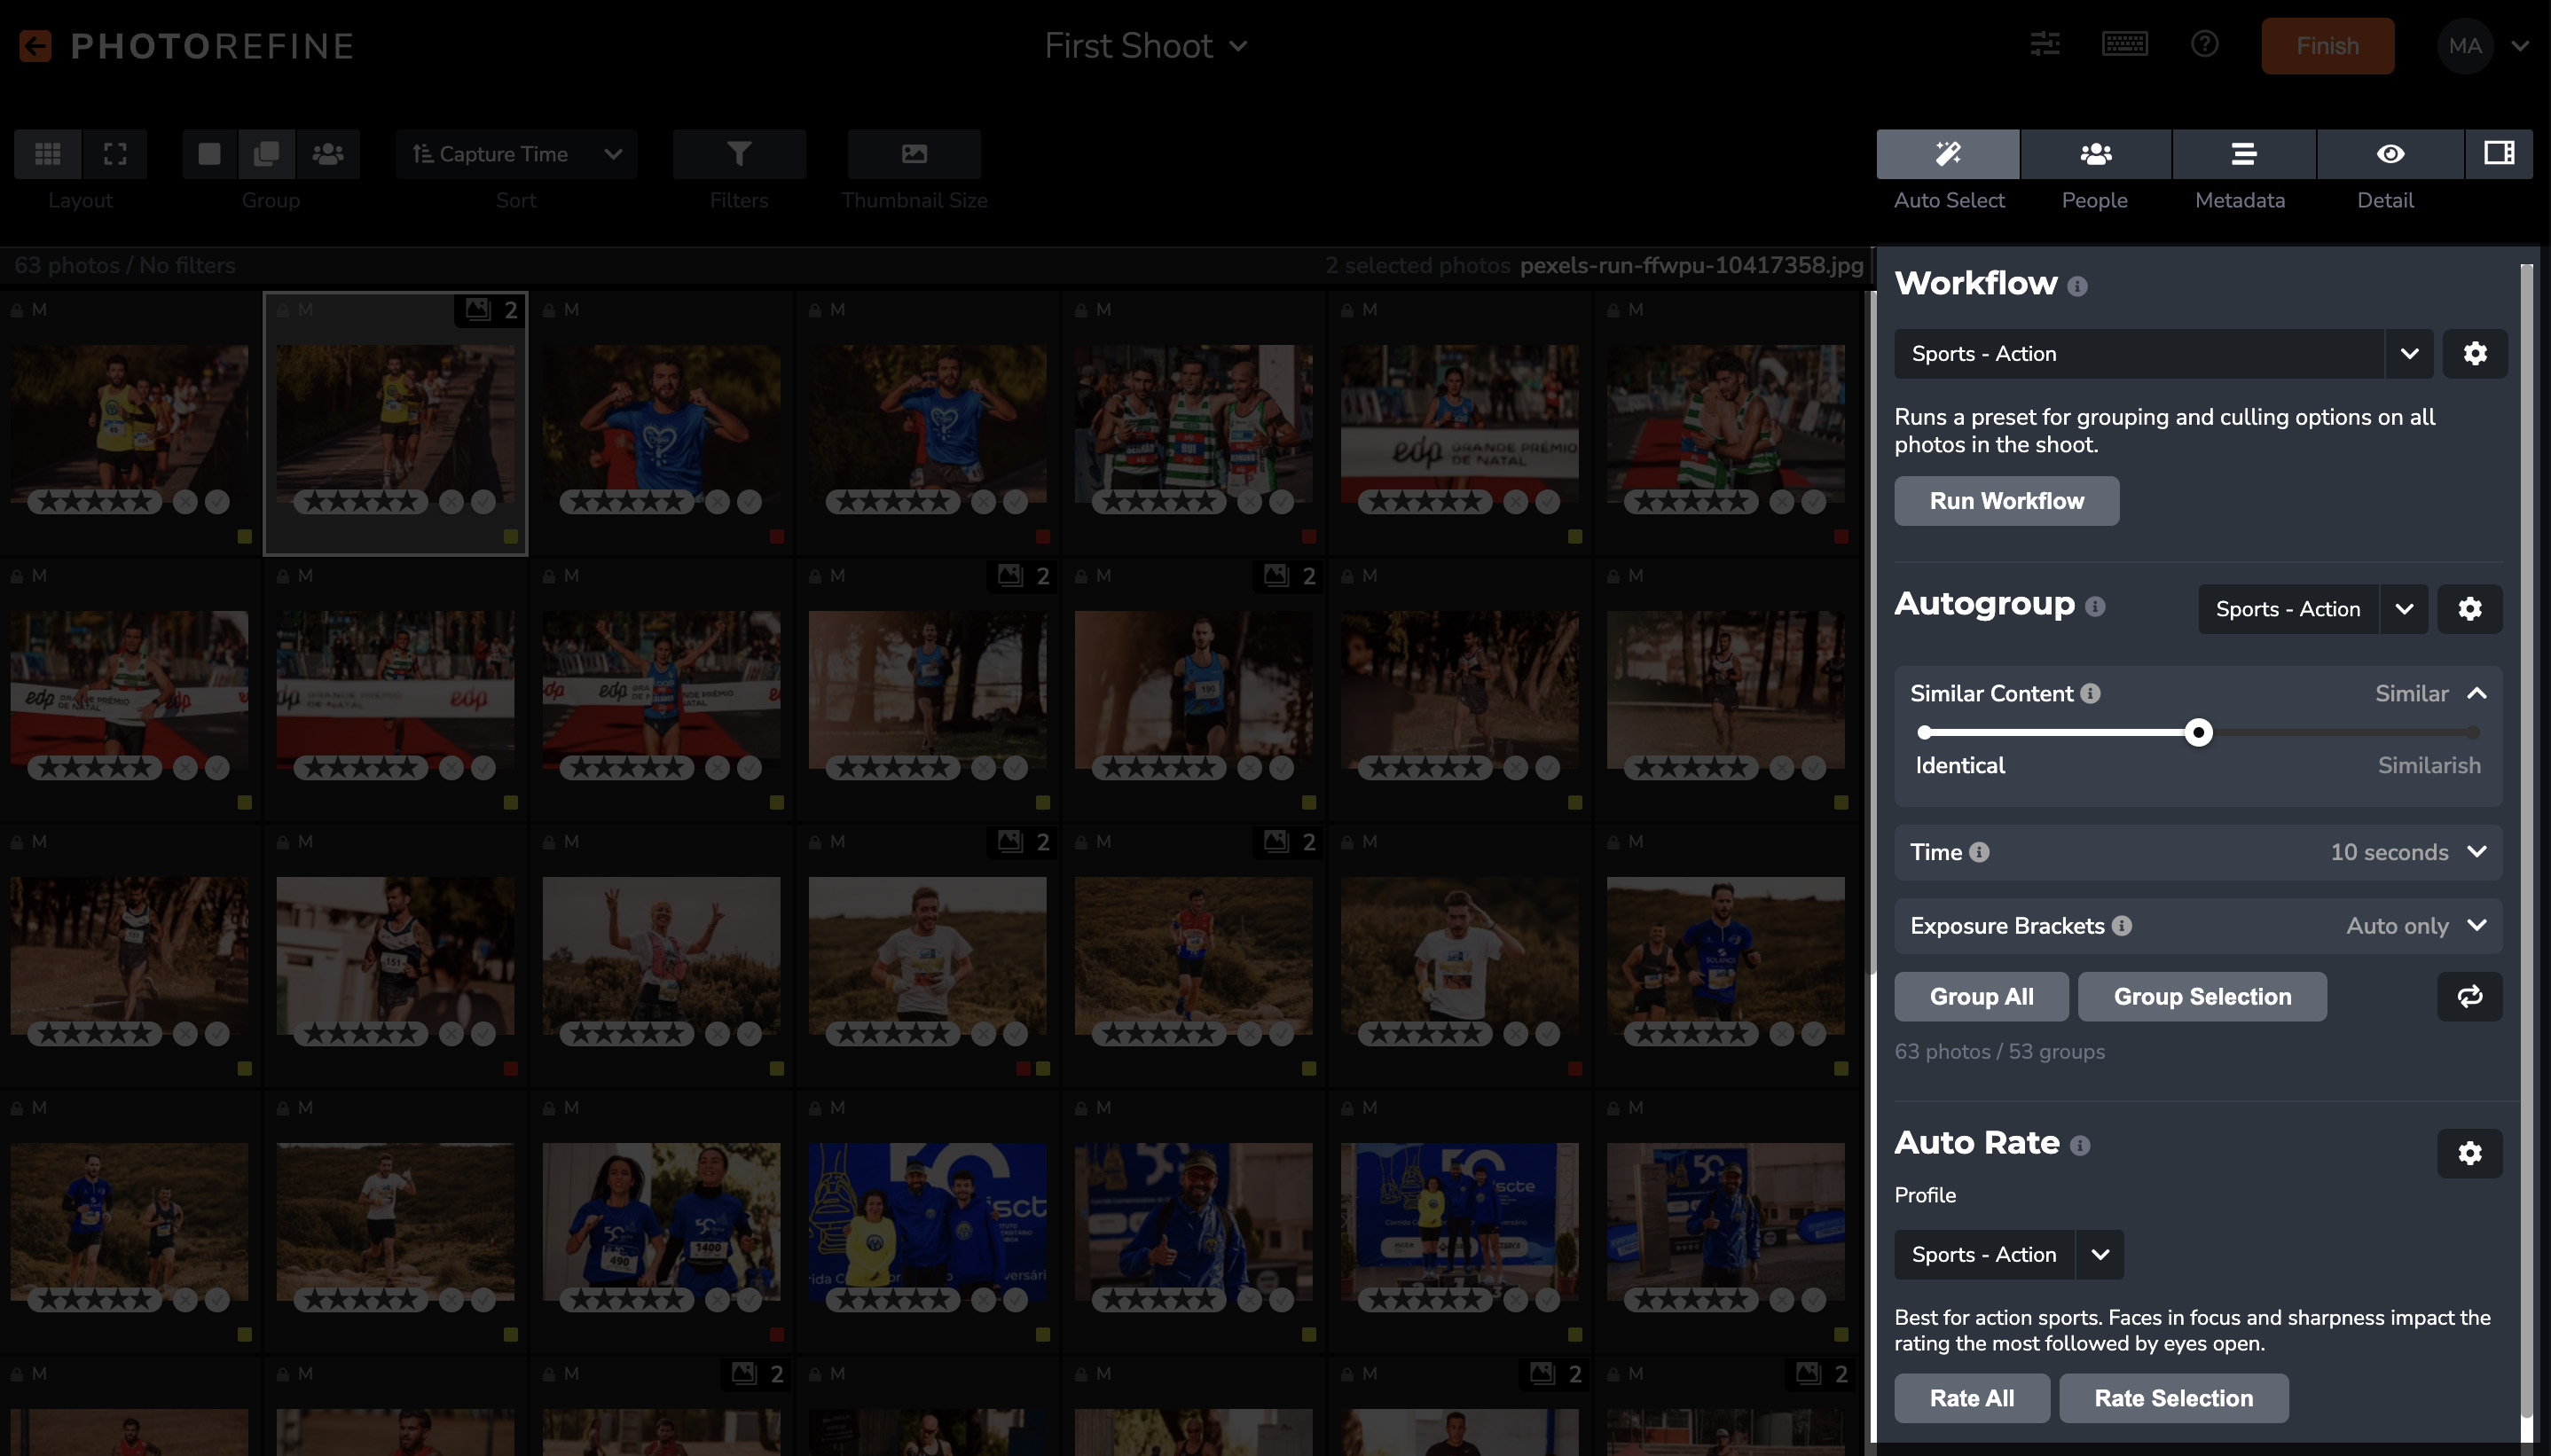
The Auto Select tab is the primary parameters that are used to group and rate your photos.
- Workflow will use the predetermined Autogrouping and Auto Rating parameters from the provided workflows. If you make any changes to Autogrouping or Auto Rating, you will create a Custom workflow. Click on Run Workflow to run a new Workflow on the imported photos.
You can use the Gear icon to create a custom Workflow Preset.
 - Autogroup creates photo groups based on content similarity with limits based on the time difference. Autogroup can also automatically identify bracketed shots for HDR or exposure stacking. You can control the aggressiveness of each of these options with the autogroup sliders. Sliding a slider to the right will group more photos together, while sliding a slider to the left will group fewer photos together.
Content Similarity - Controls grouping by content similarity of the photographs. At its strictest, photos will need to be nearly identical. At its most lenient, photos only need to have similar overall color patterns and structure.
Time - Controls what photos are allowed to be grouped together. Photos will only be grouped together based on content similarity if the difference between their timestamps is at least close.
Exposure Brackets - Controls grouping of multiple exposures. Photos will be grouped together based on exposure compensation information in Auto modes and overall exposure settings in Manual shooting modes.
You can use the Gear icon to create a custom Auto Group Profile.
Click on Group All to apply only the new Autogrouping parameters to all the imported photos. Use Group Selection to apply only to the selected photos, if any. -
Auto Rate processes each group and tags the best photo. Auto Rate profiles can be configured to tag photos based on various rules. Default rating-based and color-based profiles are pre-configured, but custom profiles can be added and customized to fit a specific workflow.
You can use the Gear icon to create a custom Auto Rate Profile.
Click on Rate All to apply only the new Auto Rating parameters to all of the imported photos. Use Rate Selection to apply only to the selected photos, if any.
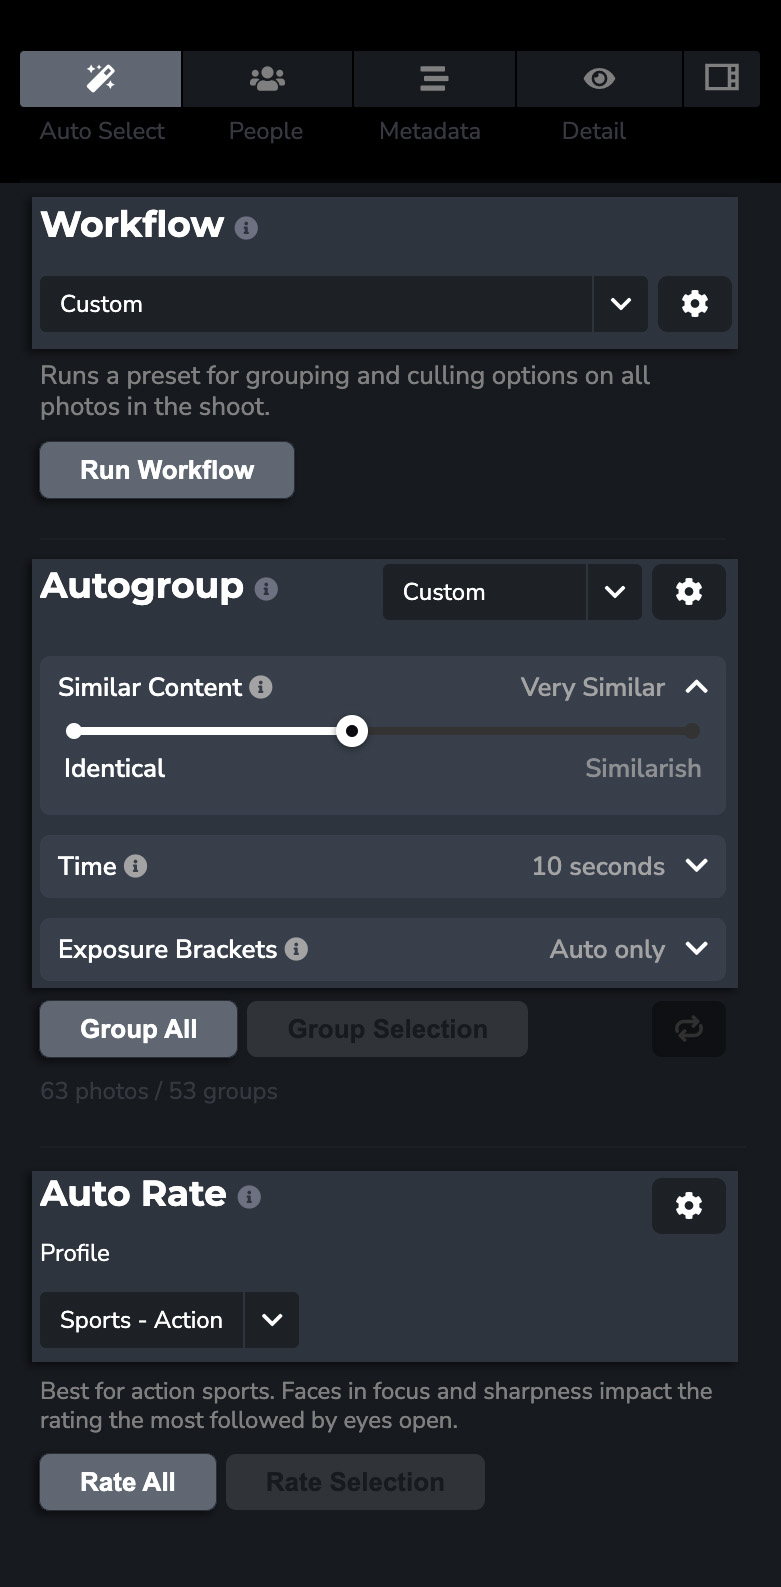
Using the ![]() Gear icon for each of these will allow you to further customize the parameters being used for each. Once you've created a custom workflow, this can then be applied to future imported photo shoots.
Gear icon for each of these will allow you to further customize the parameters being used for each. Once you've created a custom workflow, this can then be applied to future imported photo shoots.
Customizing Auto Group Profile
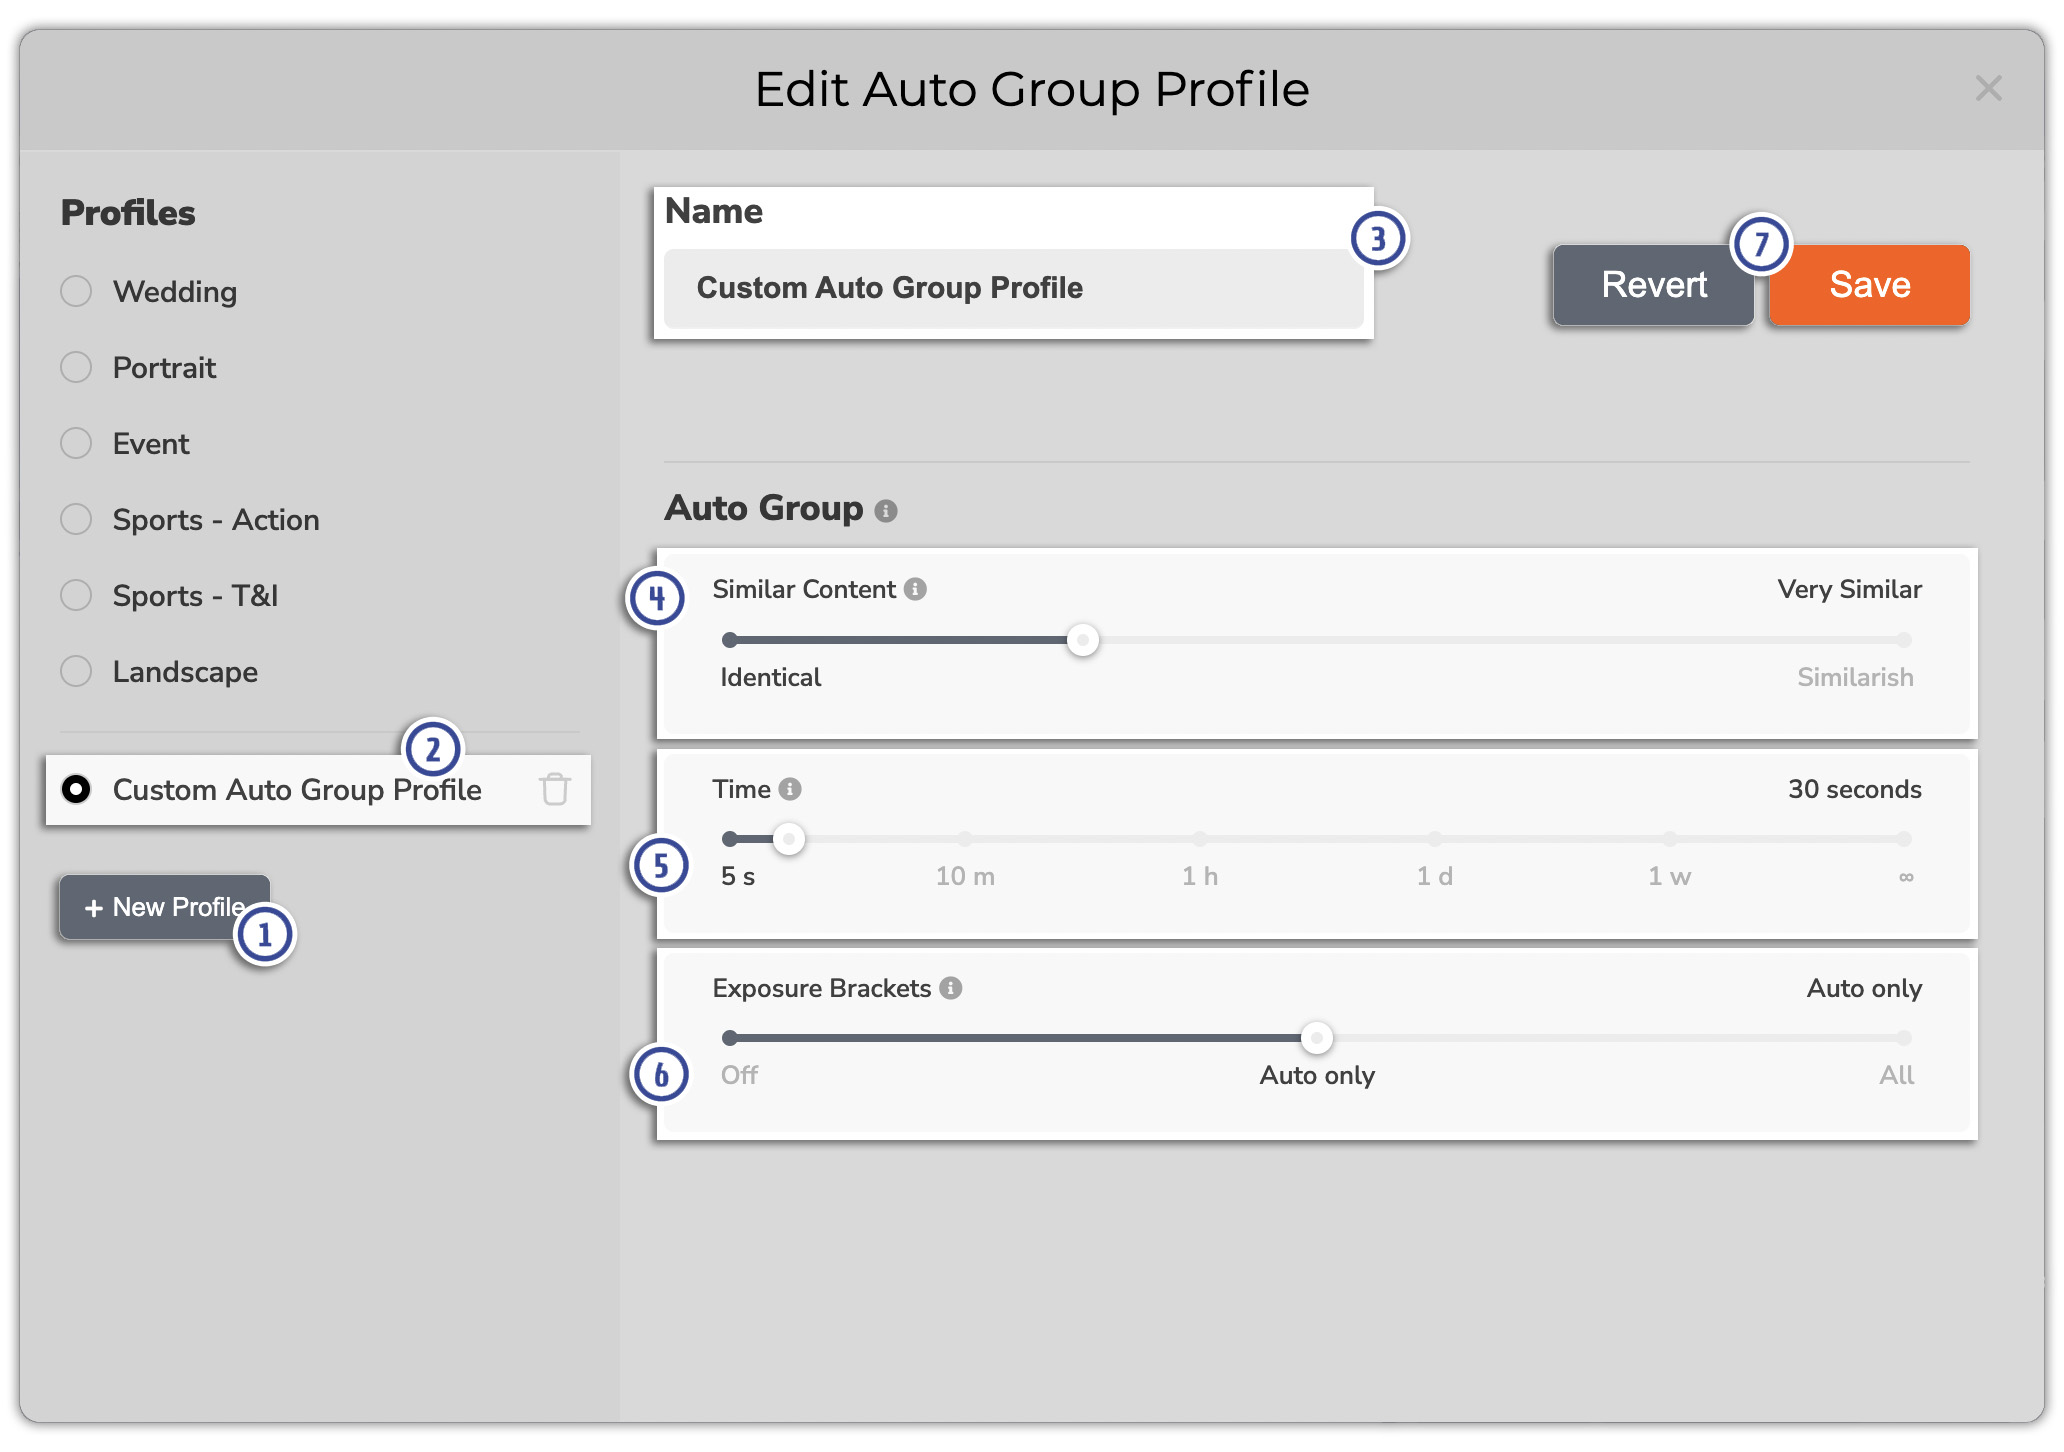
- After clicking on the
 Gear icon for the Auto Group, click on New Profile to create a custom profile.
 - Select the new Custom profile.
- You can change the Name of the profile.
- The Similar Content slider controls grouping by content similarity. At its strictest controls (left), photos will be nearly identical. At its most lenient controls (right), photos will only have similar overall color patterns and structure.
- The Time slider limits what photos are allowed to be grouped together. Photos will only be grouped together based on content similarity if they are within the timestamp variable set by you here.
- The Exposure Bracket slider controls grouping of multiple exposures. Photos will be grouped together based on exposure compensation information in Auto shooting modes and overall exposure settings in Manual shooting modes.
- If you want to revert back to what the settings were before making changes, click on Revert. If you are done setting up the Auto Group Profile, click Save. You will need to then click on X in the top right-hand corner to exit this window.
Customizing Auto Rate Profile
- After clicking on the
 Gear icon for the Auto Rate, click on New Profile to create a custom profile.
 - Select the new Custom profile.
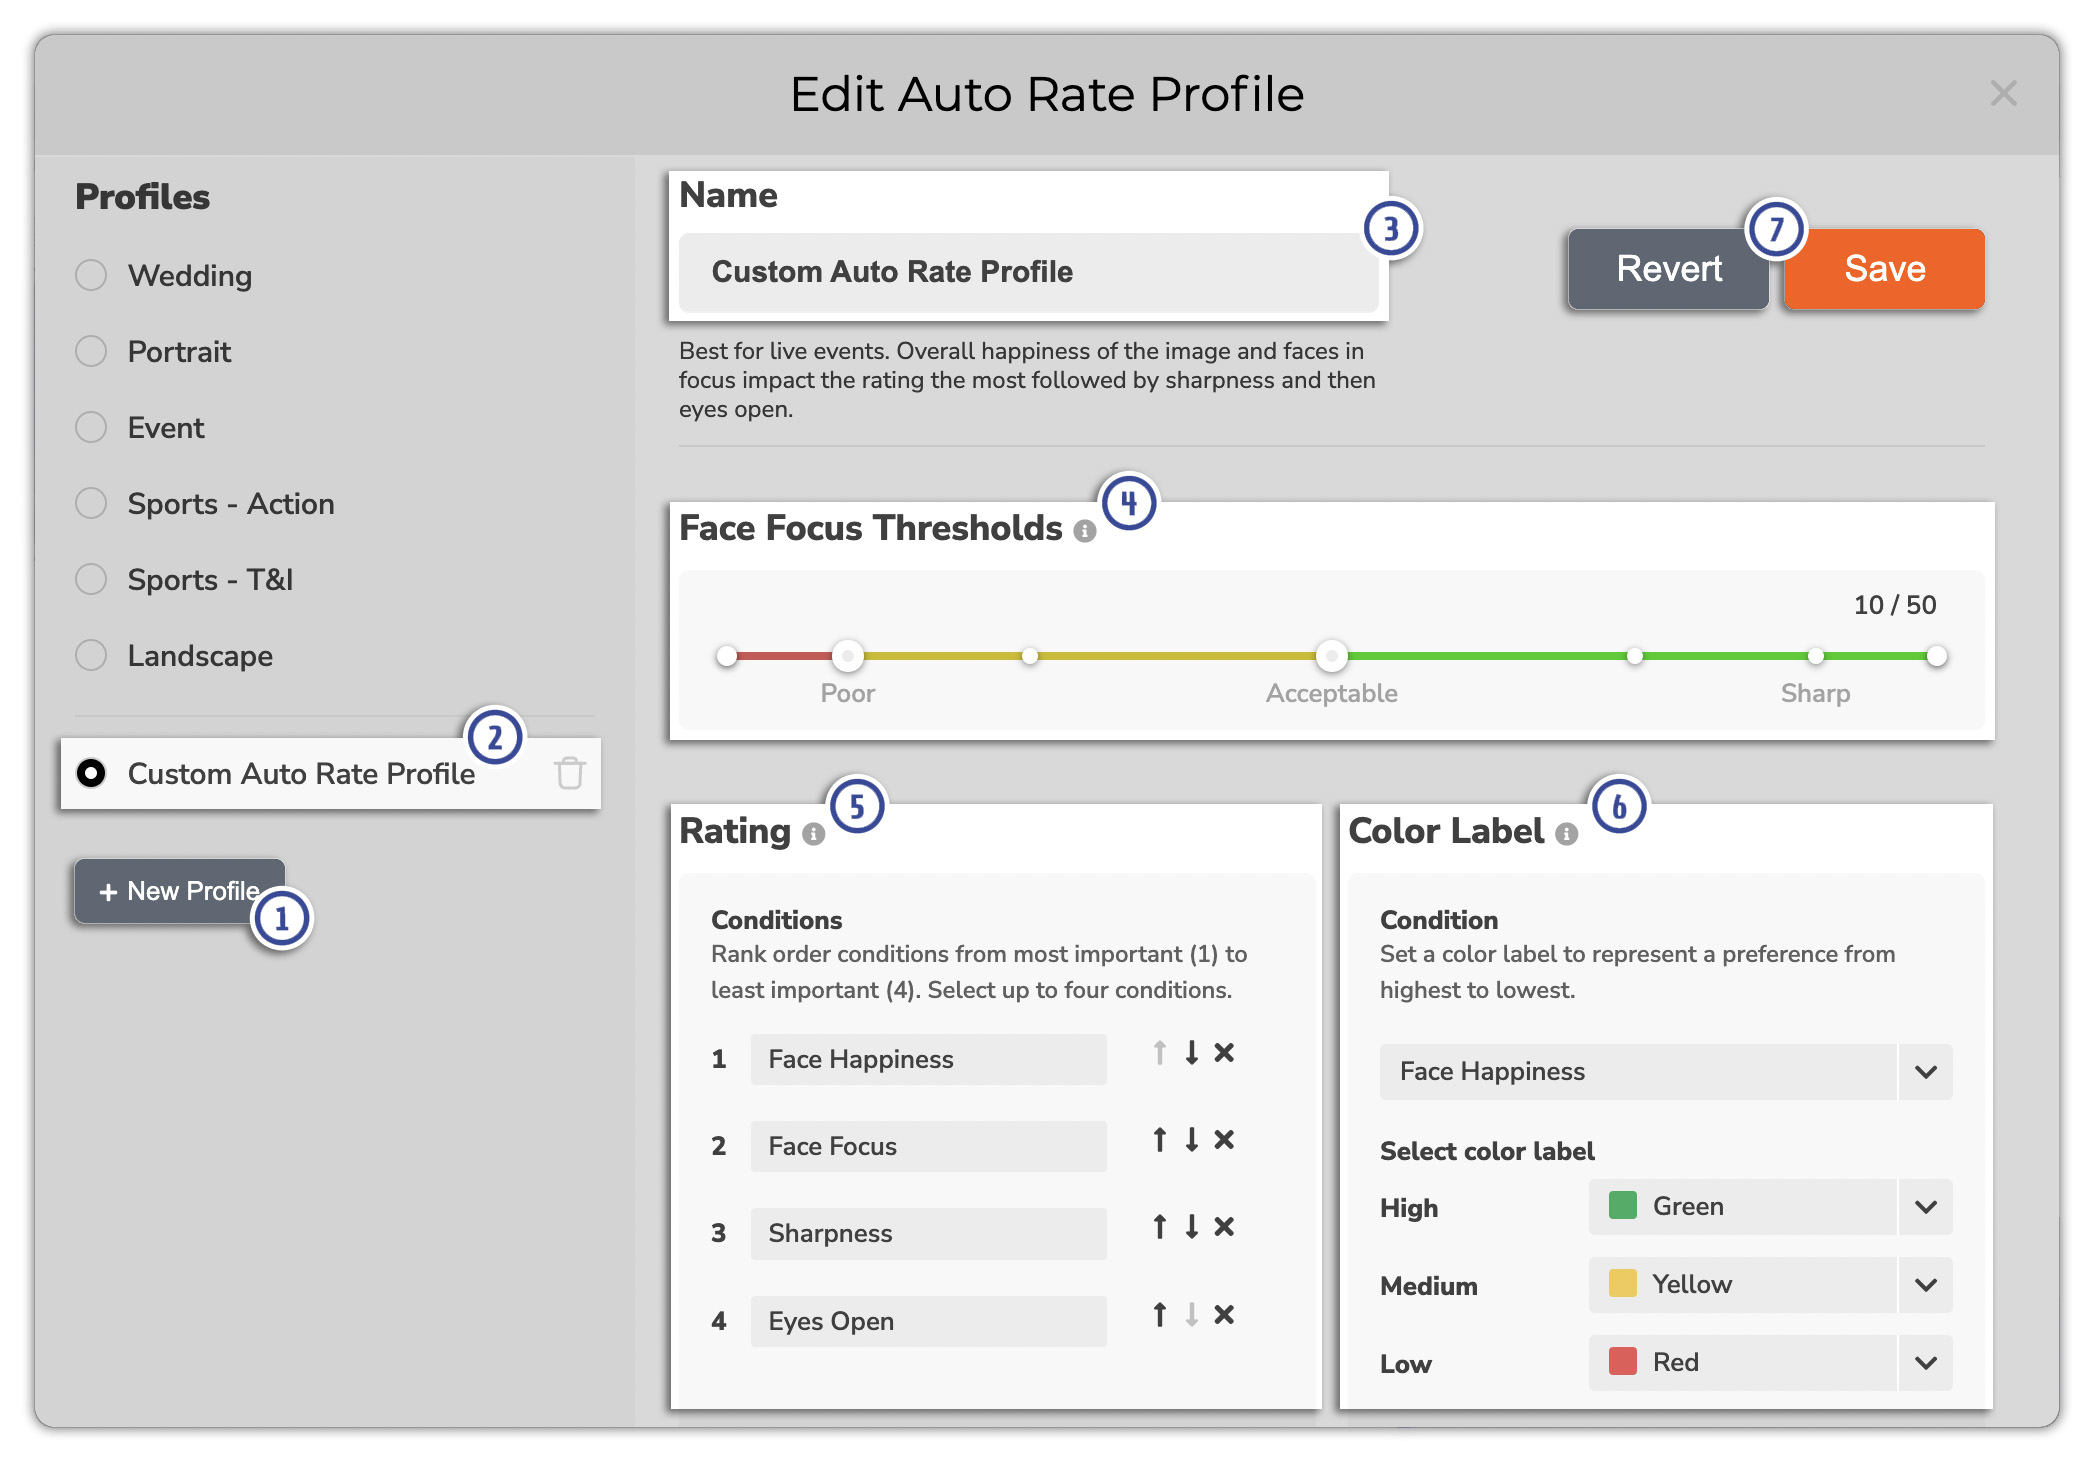
- You can change the Name of the profile.
- The Face Focus Threshold sliders control the expectations for subject focus labels. The three regions (Poor, Acceptable, Sharp) of the sliders represent the three focus labels available. Faces that fall into the Green region will be considered to have Sharp focus, faces in the Yellow will be considered to have adequate focus, and faces that fall into the Red region will be considered to have Poor focus.
- Rating allows you to order select conditions based on importance. The AI will use this to determine the rating of an image from 1-5 starts. Move the criteria up or down in priority to give it more weight over the others or remove it if it's not important to you.
- Color Label identifies the quality of a selected condition and applies the corresponding color identifier to that image. Choose the condition (i.e Face Happiness, Face Focus, etc.) and determine what color corresponds to the quality of the image.
- If you want to revert back to what the settings were before making changes, click on Revert. If you are done setting up the Auto Rate Profile, click Save. You will need to then click on X in the top right-hand corner to exit this window.
Customizing Workflow
- After clicking on the
 Gear icon for the Workflow, click on New Profile to create a custom profile.
 - Select the new Custom profile.
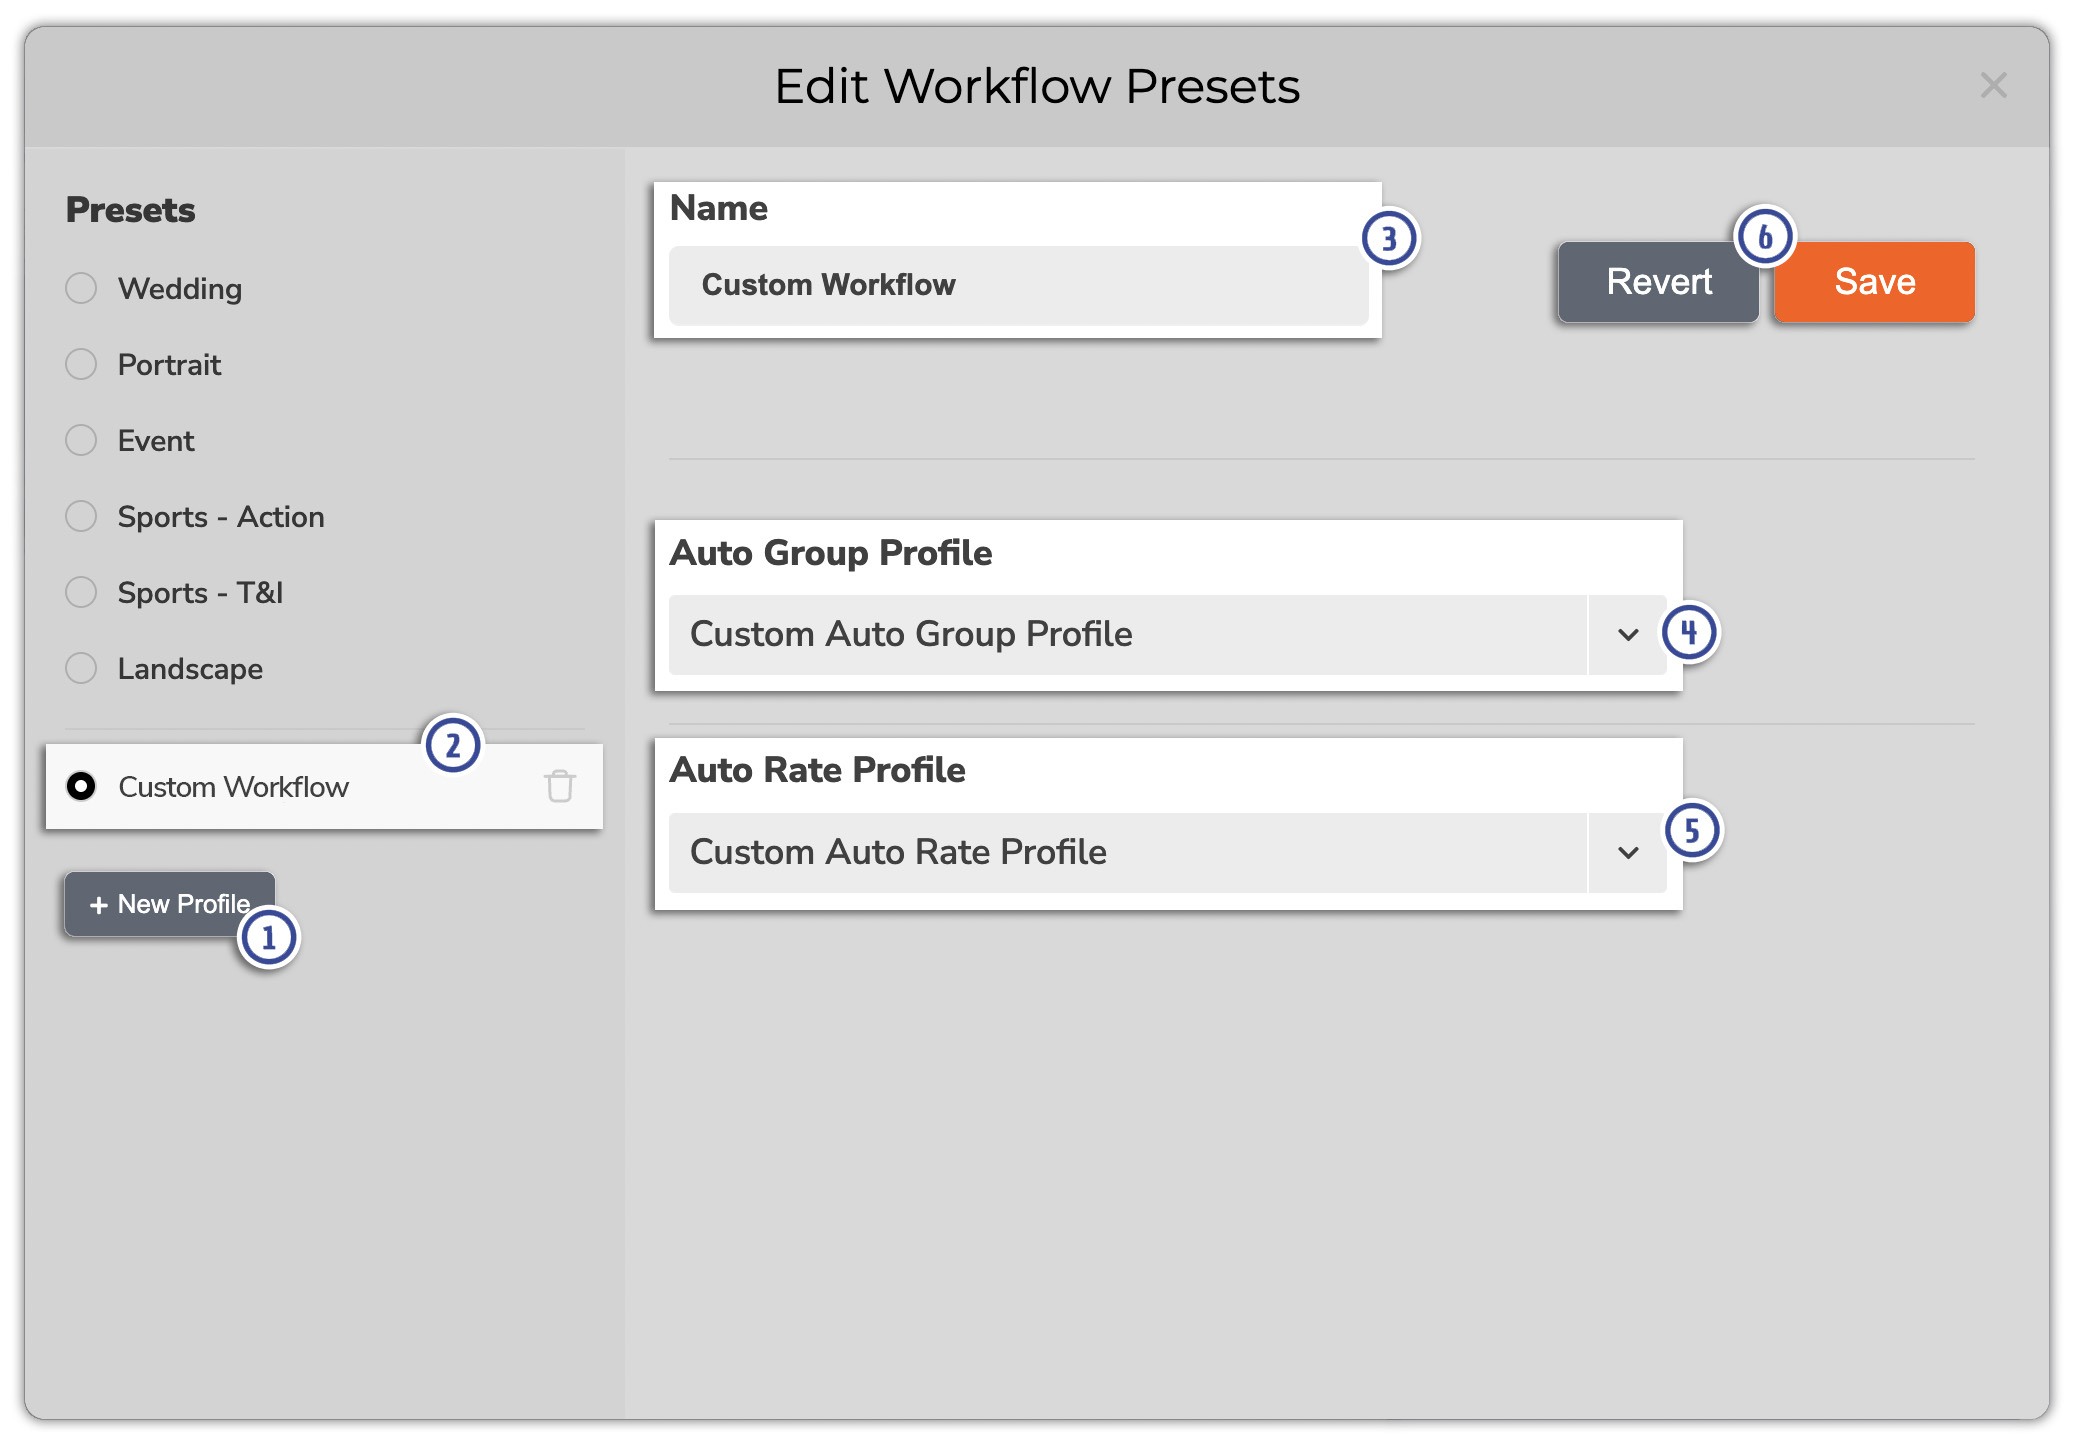
- You can change the Name of the profile.
- Choose what Auto Group Profile you want to be used in the Workflow.
- Choose what Auto Rate Profile you want to be used in the Workflow
- If you want to revert back to what the settings were before making changes, click on Revert. If you are done setting up the custom Workflow, click Save. You will need to then click on X in the top right-hand corner to exit this window.
People / Facial Recognition
Along with grouping and rating photos, PhotoRefine will also use facial recognition to differentiate between different people that appear in your imported photos.
Through the People tab, while you do not have any individual photos selected, you can determine the Similarity Threshold that will be used to determine how similar faces are. You can then use the Run Face Recognition button to have PhotoRefine find all the people in the photos again, based on the new threshold.
If you select specific photos, you'll see all of the faces recognized within that photo. Each face will be graded on its own based on Focus, Prominence, and Expression. A photo with highly graded facial recognition will be rated higher overall than photos in the same group with lower graded faces.
While you have a photo selected, if you notice that there's something wrong with the facial recognition, you can use the Something wrong? button to fine tune the recognition of the expression, focus, importance, and choose 'not a face' to remove the facial recognition from the photo.

Metadata
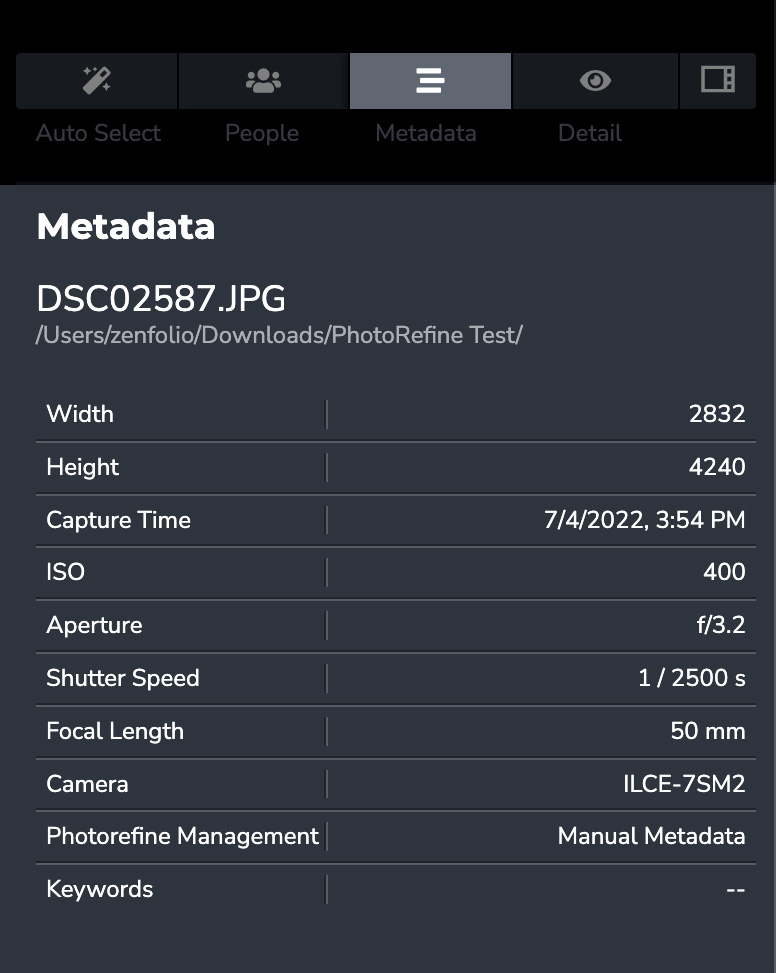
In the Metadata tab, you will find detailed information about the photo like size, time, lens, camera, etc. This information is used to determine the similarity between photos. PhotoRefine understands that photos taken with the same camera, within seconds of each other, may be of the same subject and can use other parameters previously discussed to further determine if the photos can be grouped together.
Detail
The Detail tab allows you to see some finer details of the photos, as determined by PhotoRefine. These may be aspects of the photo that are taken into account by running a workflow.

Finished Culling, What Are the Next Steps?
Once you've completed all of the culling of your photos that you've imported into PhotoRefine, you can click on the Finish button in the top right-hand corner. All of the metadata information about ratings, color labels, picked/not picked, etc. has already been added to the files themselves and you're now able to begin moving into the editing phases for your photos!
The culling that was completed through PhotoRefine should make the editing process easier in a program like Lightroom by using the ratings, color labels, etc. to pinpoint the best photos from the entire shoot that you can edit and then eventually upload.
Create a New Import
After you've completed your next photoshoot, you can create a new shoot within PhotoRefine to keep all of the photos separate from previous shoots.
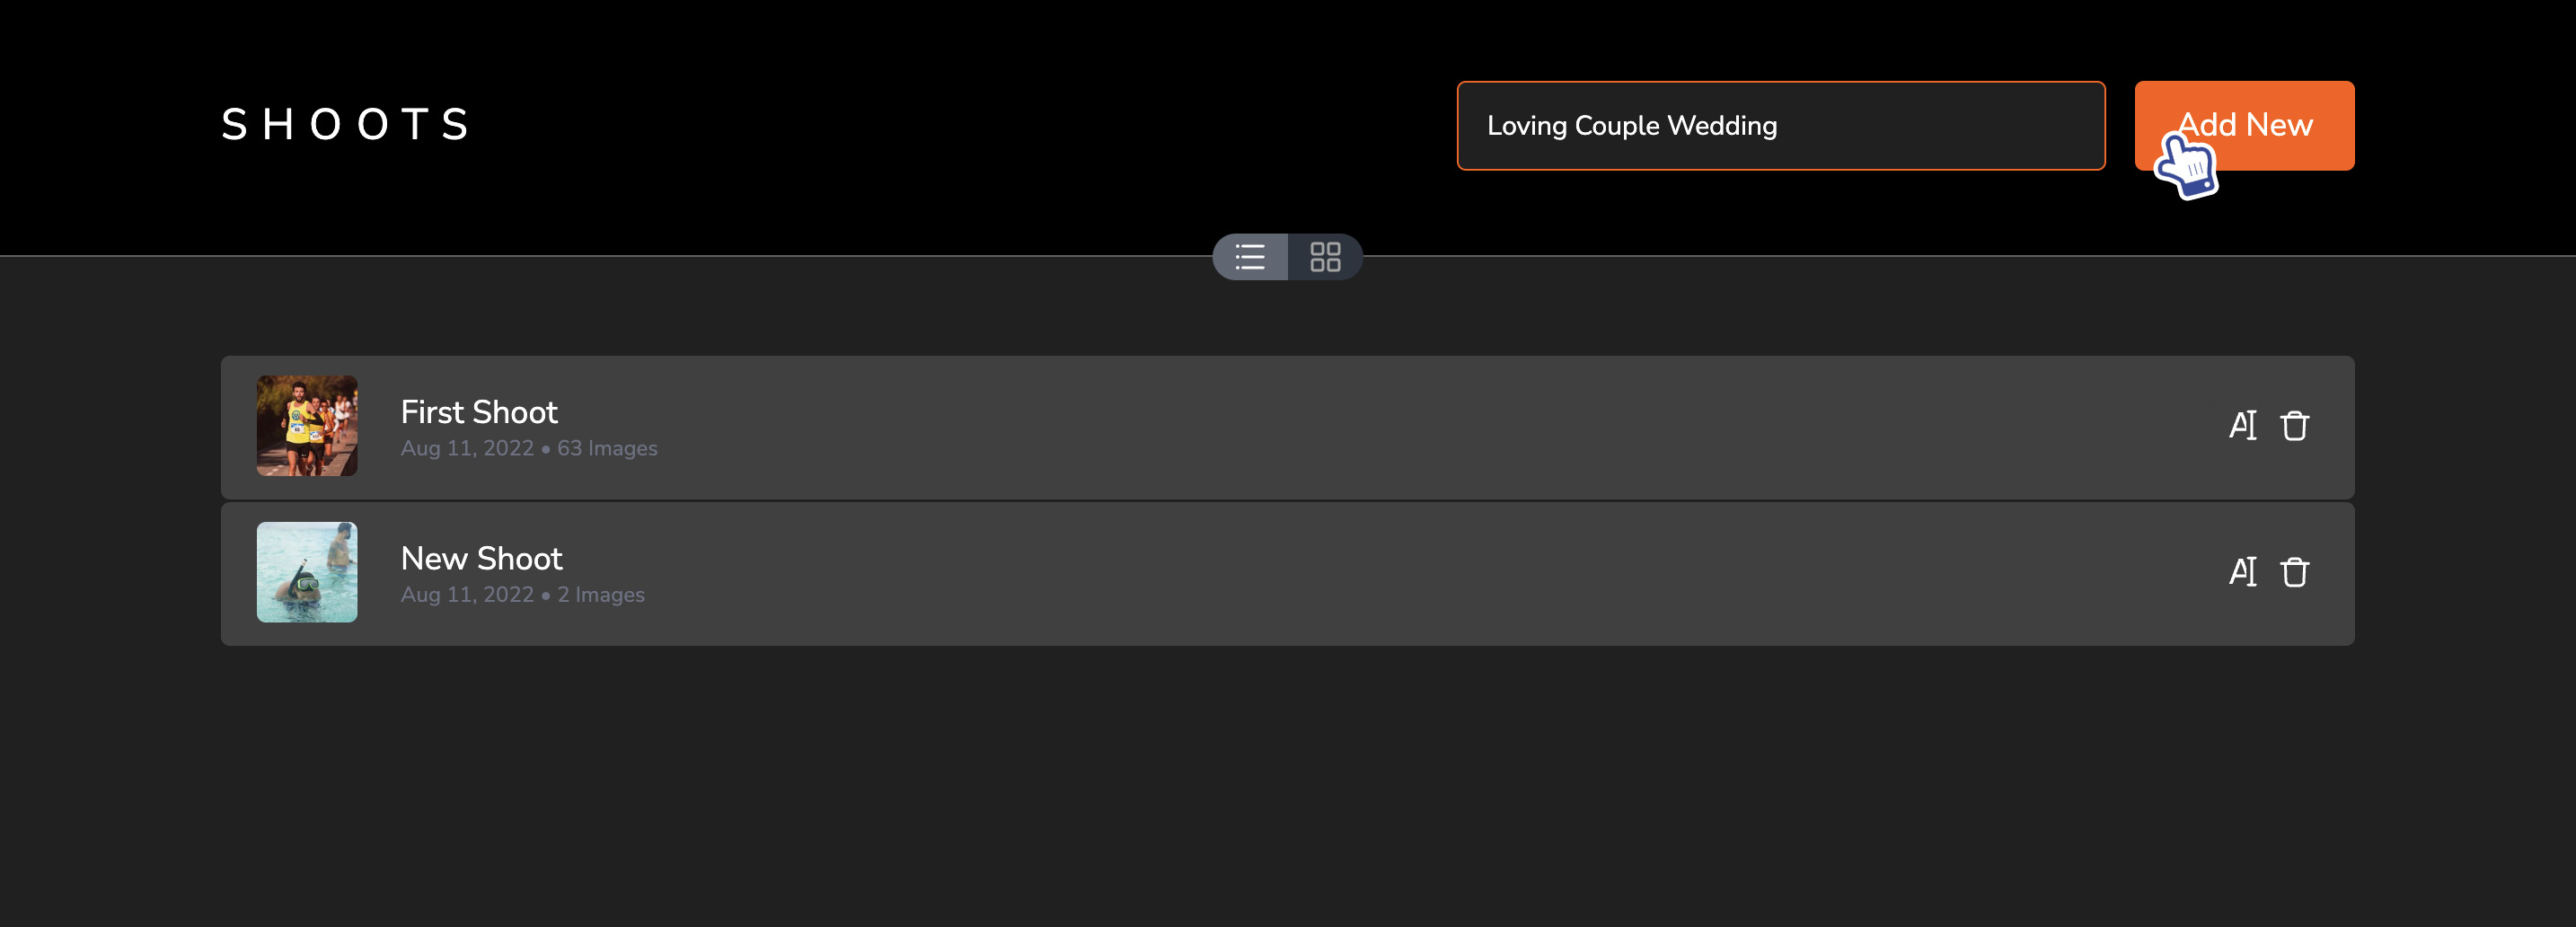
To import a new shoot to PhotoRefine, you'll want to open the application on your computer and login using your Zenfolio account credentials. Once you've logged into the application, use the text field in the top right-hand area of the screen to give your new shoot a name. Then click on Add New to create the new shoot and begin choosing photos to import.
PhotoRefine Application Preferences

Registration
The Registration button will link you back to your Zenfolio account's Billing page, so you can see what your PhotoRefine subscription information. Note: PhotoRefine is included in the ProSuite plan.
Auto-advance Selection
When using the Focused view of your photos, this option will determine whether you automatically advance to the next photo after setting a metadata property.
RAW+JPEG Handling
Many photographers choose to shoot in RAW+JPEG for faster importing and culling, as well as for backups. While PhotoRefine hopefully lessens the need for this process, it still supports several options for handling multiple copies of the same photograph.
- RAW (Recommended) - Attempts to import JPEG files with a matching basename of a RAW file will be ignored. Metadata writes will occur in an XMP sidecar.
- JPEG - Attempts to import RAW files with a matching basename of a JPEG file will be ignored. Metadata writes will occur directly to the JPEG.
- Both - RAW and JPEG files will both be imported regardless of matching basename. Metadata will be managed separately for each copy. Metadata written to the RAW will occur in an XMP sidecar. Metadata written to the JPEG will occur directly to the JPEG.
RAW Formats Supported
| Manufacturer | Format |
Supported |
|---|---|---|
| Canon | .cr2 | ✅ |
| Canon (Mirrorless) | .cr3 | ✅ |
| Sony | .arw | ✅ |
| Nikon | .nef | ✅ |
| Nikon (Legacy) | .nrw | ✅ |
| Fuji | .raf | ✅ |
| Panasonic | .rw2 | ✅ |
| Pentax | .pef | ✅ |
| Olympus | .orf | ✅ |
| Leica | .dng | ✅ |
| Apple (iPhone) | .dng | ✅ |
| Samsung (Galaxy) | .dng | ✅ |
| Canon (Legacy) | .crw | 🚫 |
| Hasselblad | .3fr | 🚫 |
Multiple Photo Modification Warning
This will determine whether or not you want to be warned when attempting to modify multiple photos at one time.
File Consolidation Warning
Choose whether or not you want to be warned if imported photos were changed due to the RAW+JPEG Handling setting.
DNG Converter Integration
Digital Negative (DNG) is a patented, open, lossless raw photo format developed by Adobe and used for digital photography in order to view RAW files in a 1:1 preview of the photos.
Most common camera models and their RAW files are supported natively; however, certain RAW file types will require processing with Adobe’s DNG Converter in order to preview the photos in PhotoRefine. You don’t need to manually convert files to DNG with the converter in order to handle them in PhotoRefine. Simply install Adobe DNG Converter in the default system location to be able to use it.
If PhotoRefine is unable to find the DNG Converter and you attempt to create previews for a camera model that requires it, you will be prompted to install the converter instead.
Maximum Parallelism
Determine how many tasks PhotoRefine can perform simultaneously. Increasing this will improve the import speed of PhotoRefine, but it will also slow down other programs on your computer. Lowering this will make importing slower, but will not have as much of an impact on other programs.
Face Focus Highlighting
Determine the threshold at which faces will be considered out of focus. Drag the slider to the left for poor lighting situations, or drag the slider to the right for higher quality lighting situations. If the slider is dragged to the right, poor lighting conditions may cause faces to be flagged out of focus.
System Requirements
Mac
New 2020 Macs with the Apple M1 chip are also compatible when run with Rosetta 2
| Requirement | |
| Processor | Intel® processor with 64-bit support, SSE4.2 and AVX instruction sets; 2 GHz or faster processor |
| Operating system | macOS Sierra or later (10.12+) |
| RAM | 4 GB of RAM (8 GB recommended) |
| Hard drive | 2 GB of available hard-disk space for program installation |
| Monitor resolution | 1024 x 768 minimum |
| Internet | Internet connection required for PhotoRefine software activation |
Windows
| Requirement | |
| Processor | Intel® or AMD processor with 64-bit support, SSE4.2 and AVX instruction sets; 2 GHz or faster processor |
| Operating system | Microsoft Windows 10* with 64-bit support (Version 1803 or later) |
| RAM | 4 GB of RAM (8 GB recommended) |
| Hard drive | 2 GB of available hard-disk space for program installation |
| Monitor resolution | 1024 x 768 minimum |
| Internet | Internet connection required for PhotoRefine software activation |
Does PhotoRefine work with Lightroom?
Yes! Any rating or color label assigned by PhotoRefine will appear when imported in Lightroom.
Does PhotoRefine support camera RAW files?
Yes! (Probably). PhotoRefine works with a wide array of RAW formats from tons of camera models and coverage can be even further expanded by installing Adobe’s free DNG converter.
Does PhotoRefine automatically edit my photos too?
No. For now, PhotoRefine is a tool strictly for photo culling, designed to be used in conjunction with another editor like Lightroom.
The process of culling is used in every type of photography and is used by professionals and amateurs alike. Culling is simply the process of selecting the best images from a shoot to be edited and delivered to a client.
Our recommended workflow is to cull all your photos in PhotoRefine before importing to another editor like Lightroom or Luminar.

