No longer will you need to copy and paste different types of emails that you're wanting to send out for different types of clients that you may be working with!
Email Templates allow you to save fully composed emails that you can quickly select when inviting Clients, Guests, or other Visitors to a Gallery. And with the help of Variables, you can provide an automated personalization to every email sent, depending on the specific information of the Gallery or Client that you're sending the email to, with just one singular email template.
You can either use/edit the provided pre-added Templates, or you can create your own custom templates for a variety of purposes and types of recipients.
Editing Existing Email Templates
- In your account click on the
 CRM Icon.
 - Go to the Templates tab.
- You can click on a specific template to open and edit it.
- You can also use the
 ellipsis button to access other options for the template.
 - In the menu that appears from the ellipsis you can Edit Template, Rename, Duplicate, Make Default, or Delete. The Template you choose as the Default will be indicated on this page with
 and this will be the Template that loads automatically when you go to send a Gallery invite. Keep in mind that Deleting a template cannot be undone.
When you select a specific Template to edit, you'll be able to change anything about the email, just as if you're creating a completely new Template. However, when you save the changes, it will replace the existing template. See HERE about creating a completely new Template.
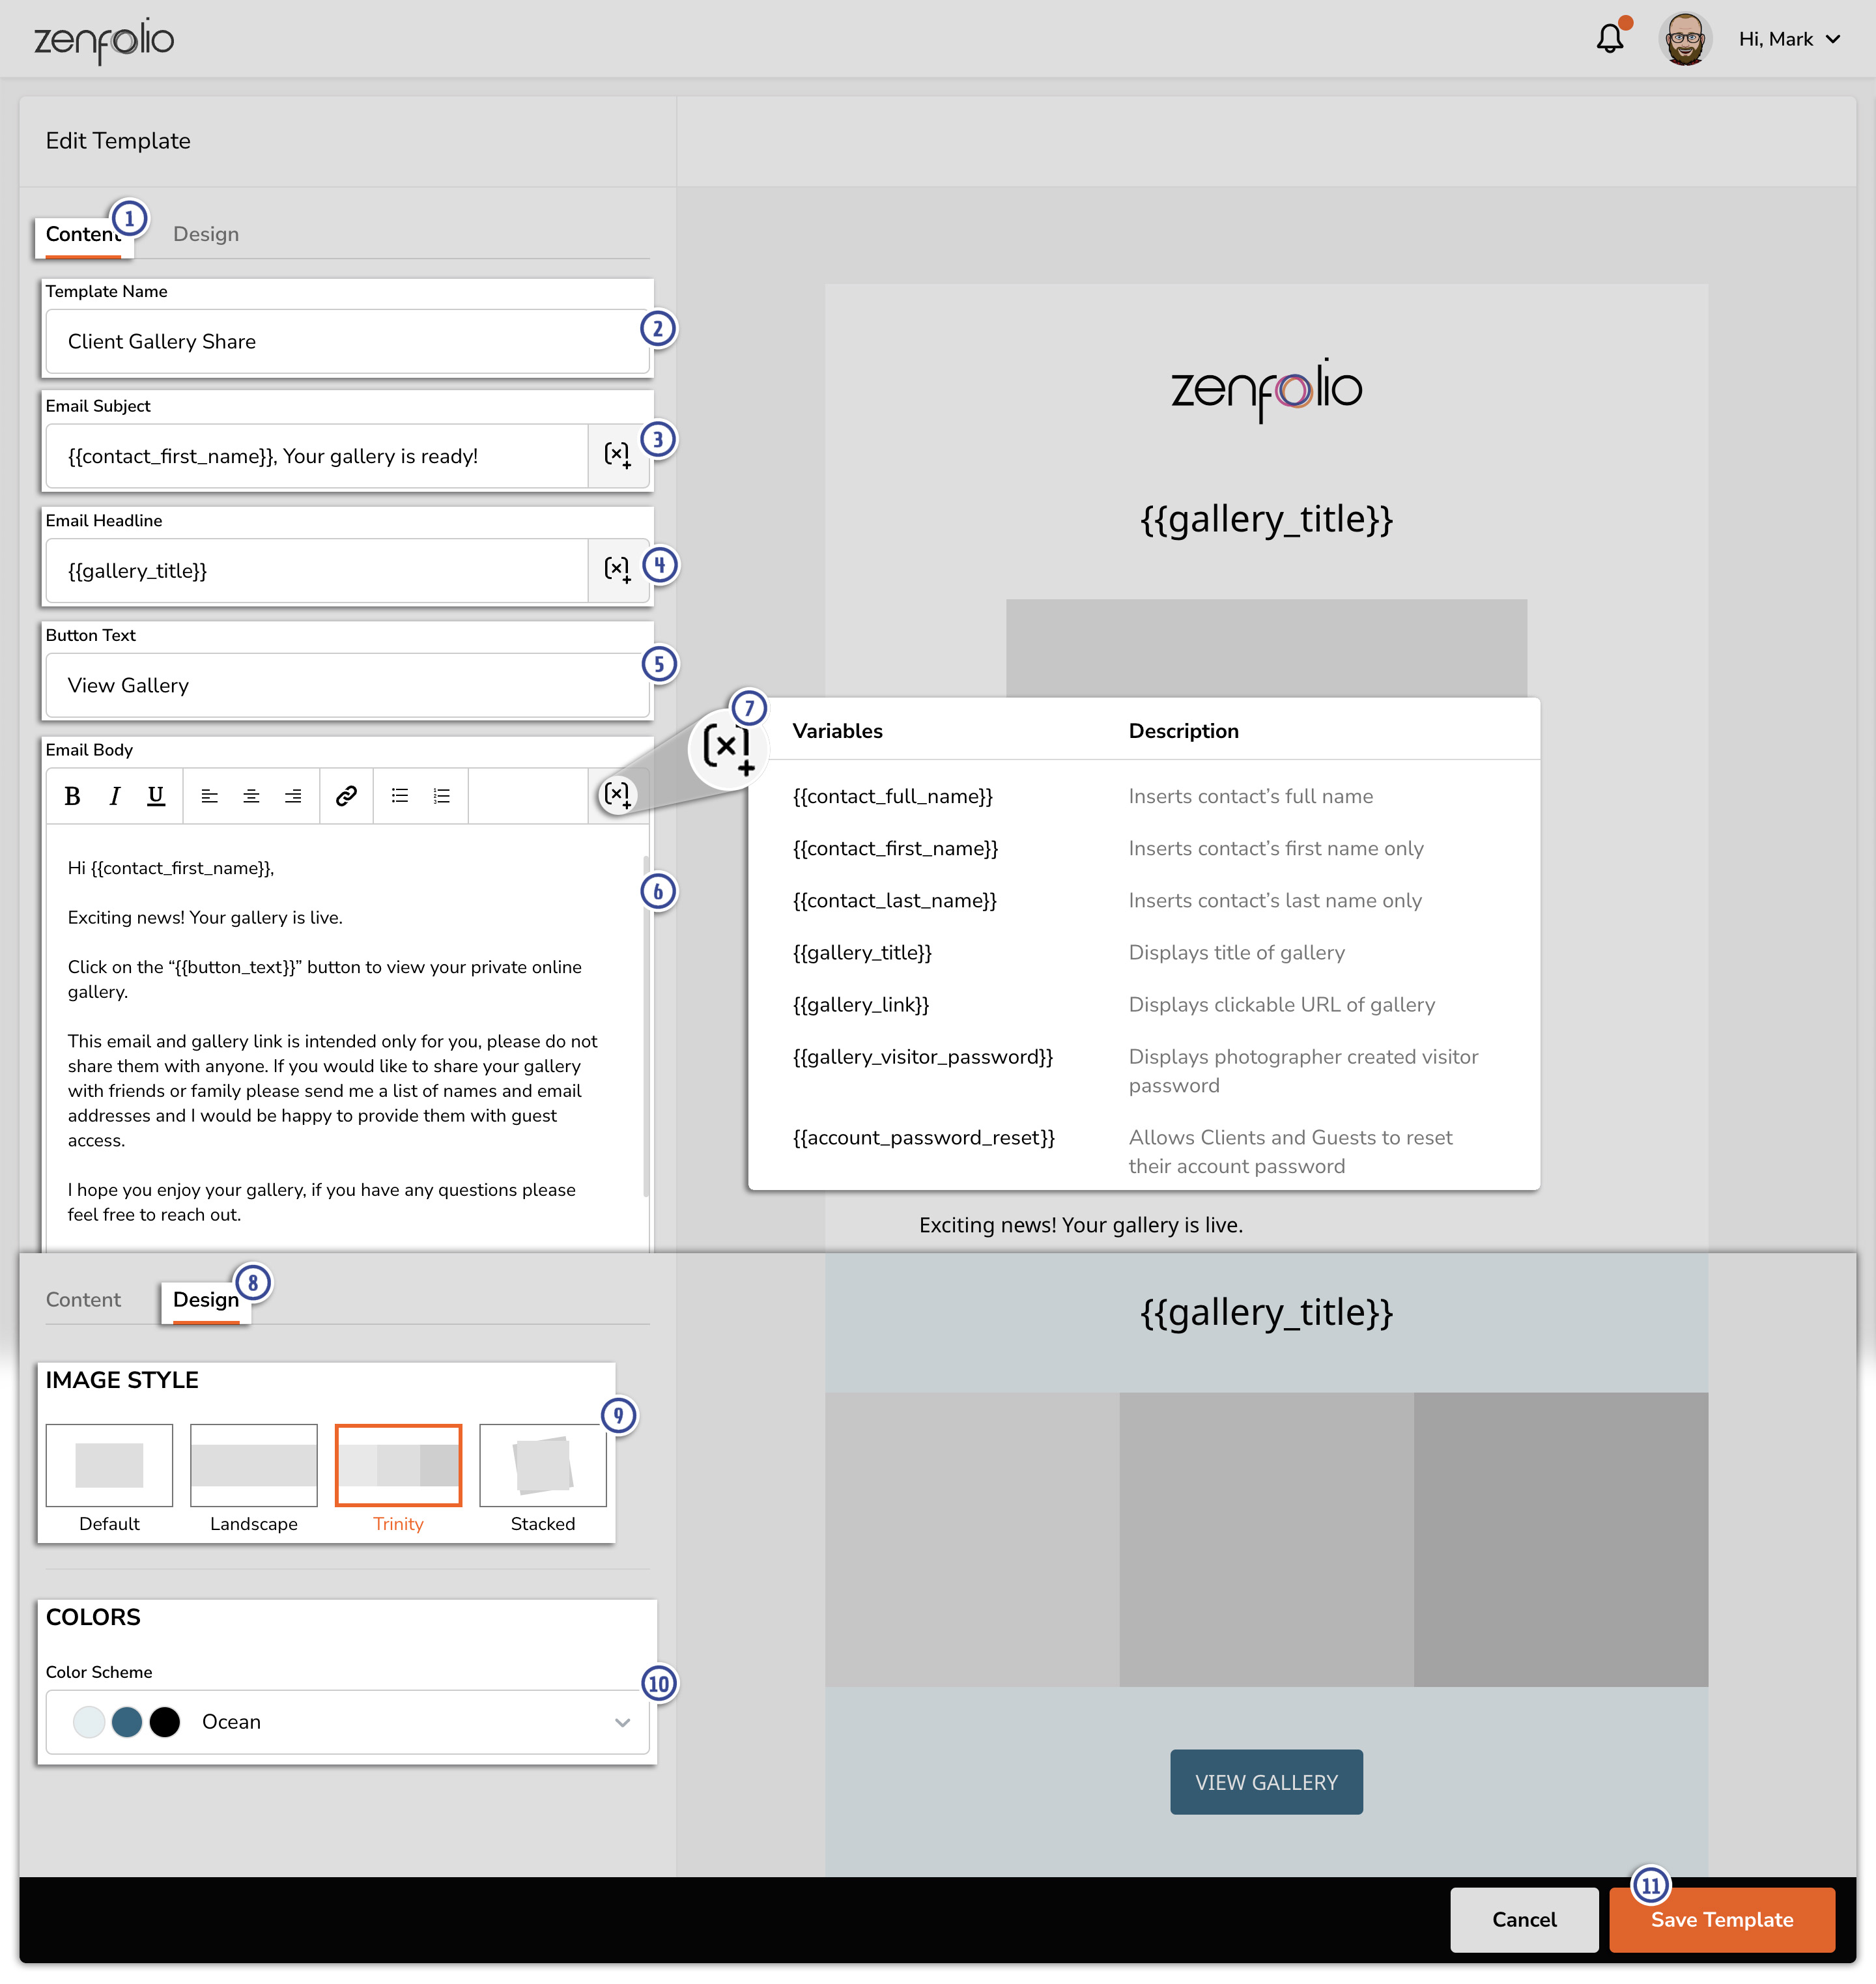
- When you get into the Template to edit, click on the Content tab.
- Edit the Template Name (Not visible to recipients of the email). You will not be able to use a Template Name that's already being used by another Template.
- Edit the Email Subject line.
- Edit the Email Headline.
- Edit the call to action Button Text.
- Edit the primary text of the email, in the Email Body.
- Some of these fields will allow you to add Variables just by clicking on this icon and selecting the Variable information you want to add. See more information about using Variables HERE.
- Next, go to the Design tab.
- Edit the Image Style that will determine what the preview photo(s) look like.
- Edit the Colors that will be used to determine the color palette of the email. It is not currently possible to customize these Color options.
- Once you've completed making changes, click on Save Template. Now you can send the email through a Gallery.

Creating A New Email Template
- In your account, click on the
 CRM icon on the left-hand side.
 - Go to the Templates tab.
- Click on Create Template.
- Choose the type of Template that you will start creating. The type of template that you choose will provide you with a starting point, with the default text and content of the pre-written Templates.
- Click Create Template.
Next, you'll be able to create all of the content of the Email Template. Here is a breakdown of each item you can change for your new Template.
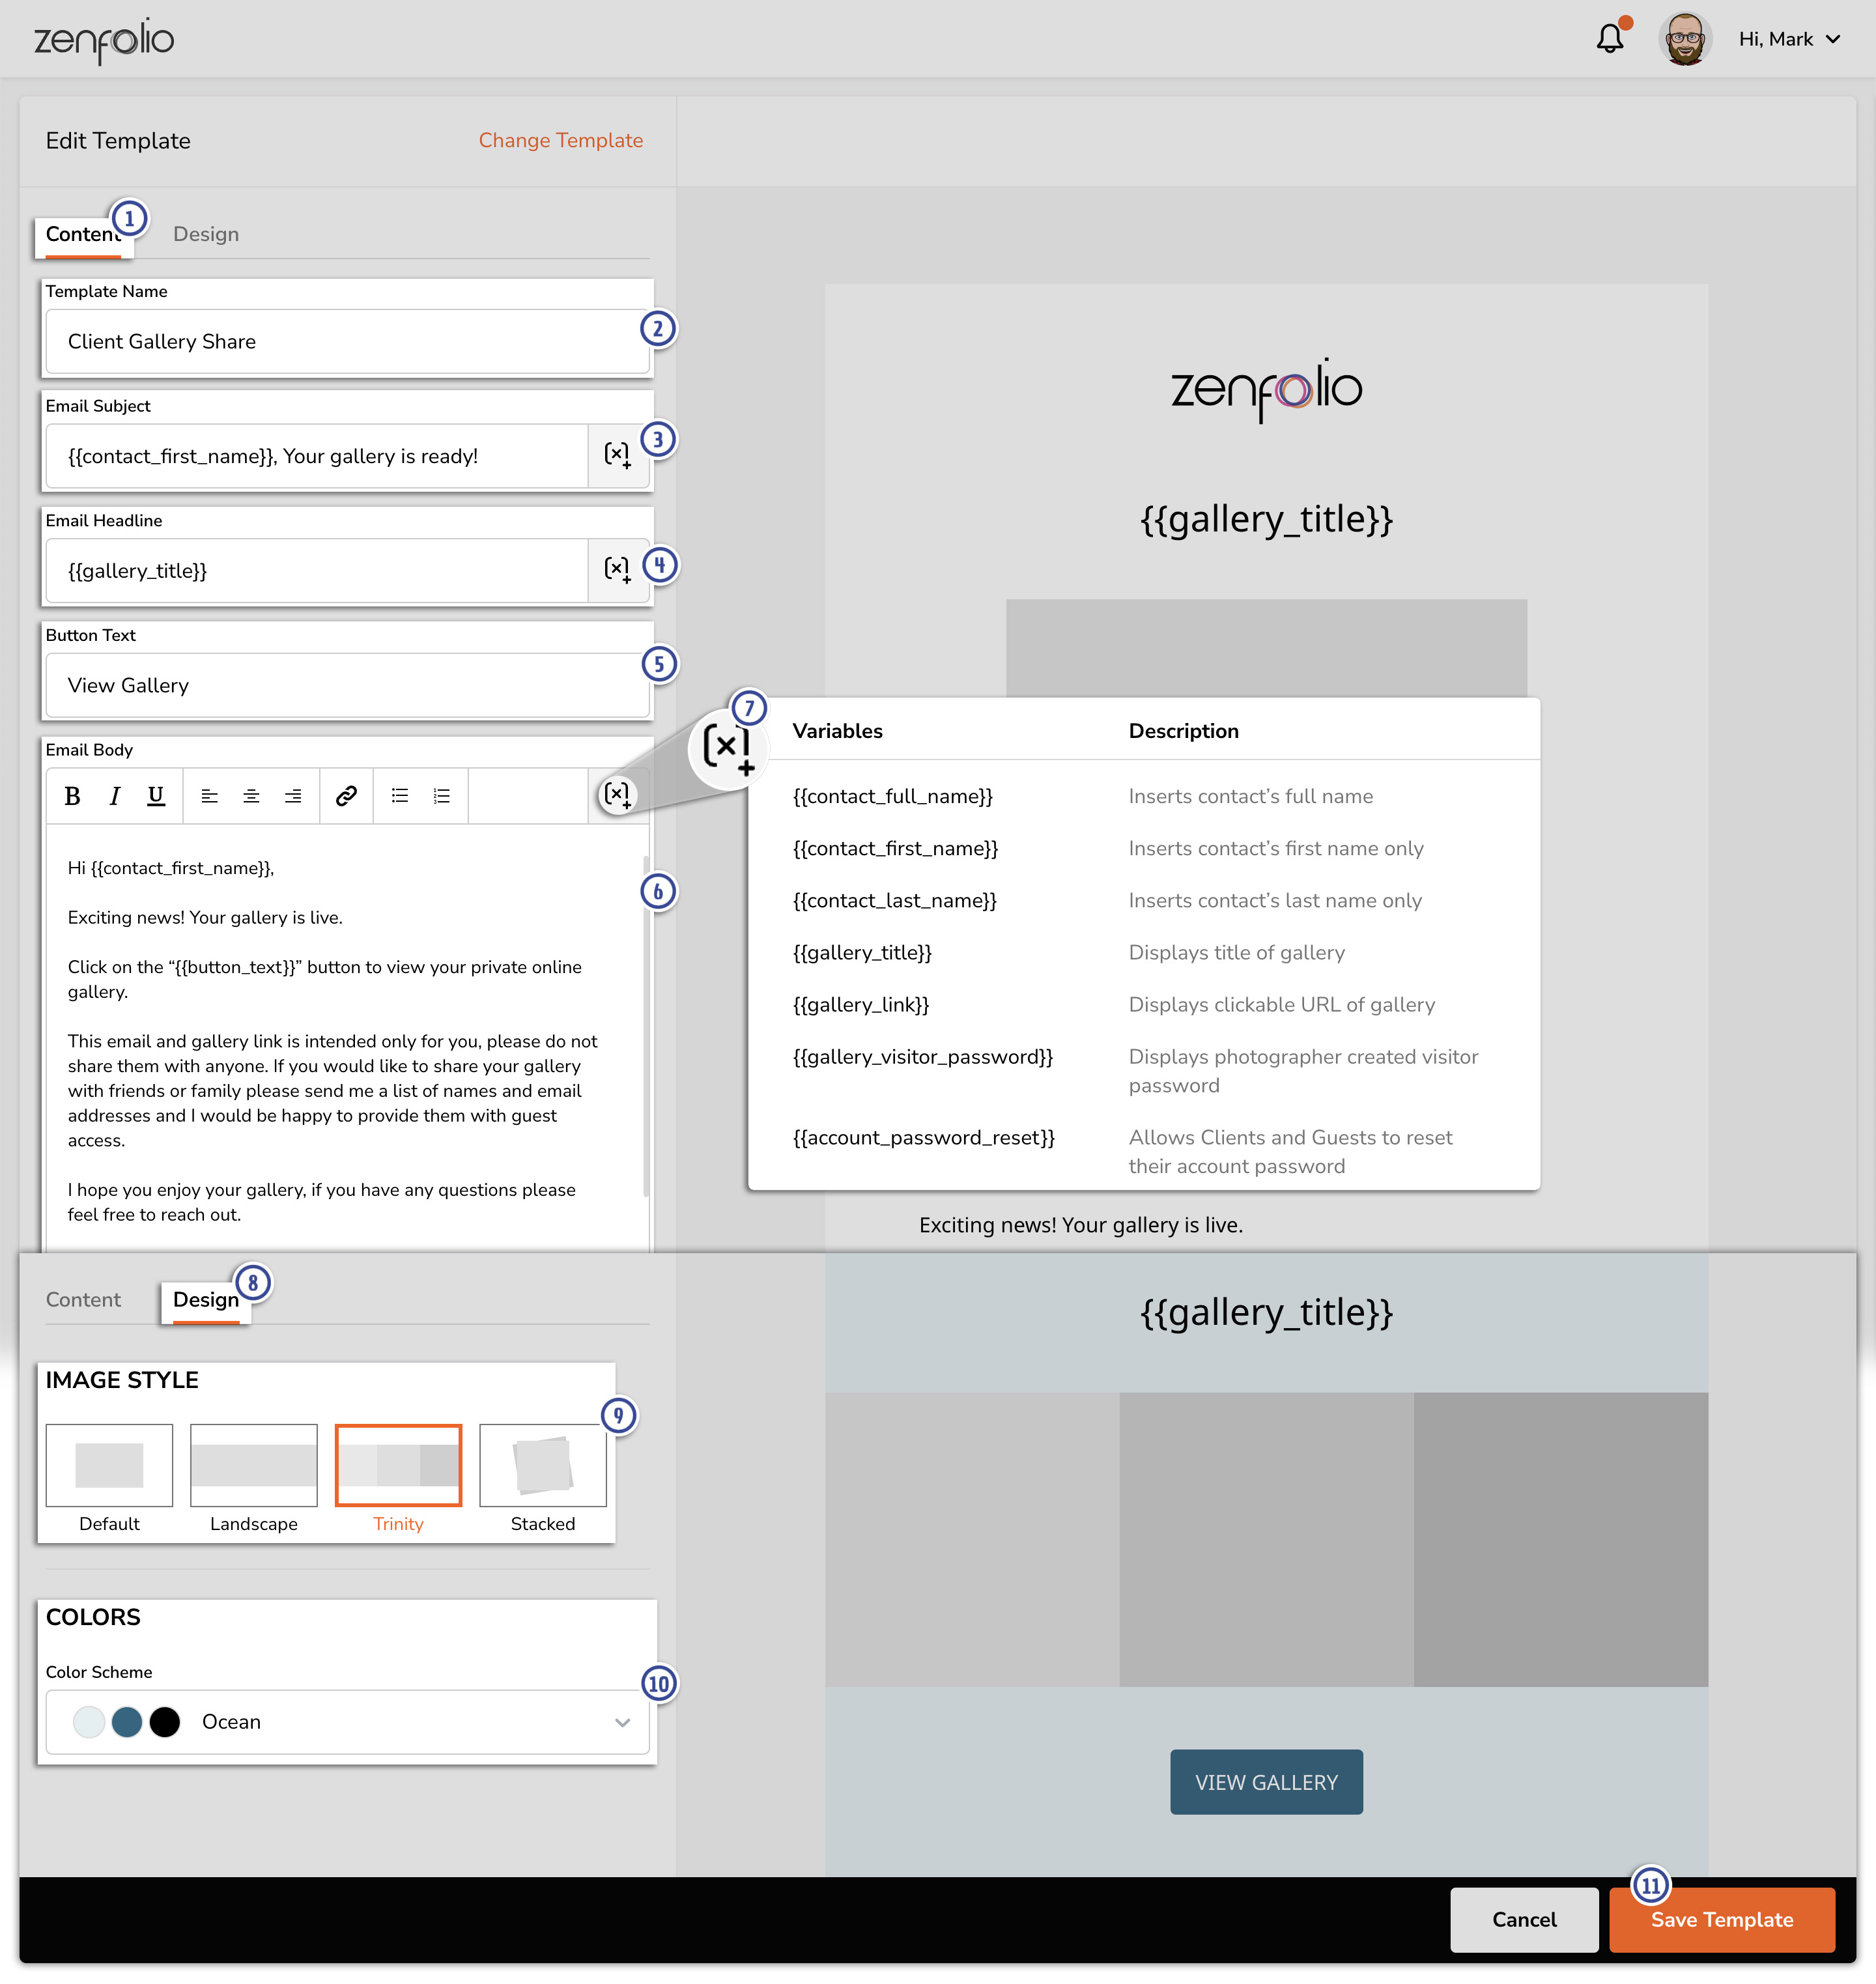
- When you get into the new Template, click on the Content tab.
- Create the Template Name (Not visible to recipients of the email). You will not be able to use a Template Name that's already being used by another Template. If you're wanting to edit an existing template, see the instructions HERE.
- Create the Email Subject line.
- Create the Email Headline.
- Create the call to action Button Text.
- Create the primary text of the email, in the Email Body.
- Some of these fields will allow you to add Variables just by clicking on this icon and selecting the Variable information you want to add. See more information about using Variables HERE.
- Next, go to the Design tab.
- Select the Image Style that will determine what the preview photo(s) look like.
- Select the Colors that will be used to determine the color palette of the email.
- Once you've completed making changes, click on Save Template. Now you can send the email through a Gallery.

Using Variables In Your Templates
Email variables allow you to add automated personalization in your emails by pulling in relevant contact/Gallery information. No need to copy and paste the gallery link anymore, just use the appropriate variable in your template, and it will replace the variable with the correct information from the gallery when you send the email. If there are multiple Clients, Guests, or Other Visitors that the email is being sent to, each individual recipient will see information applicable to only their contact information, thanks to Variables.
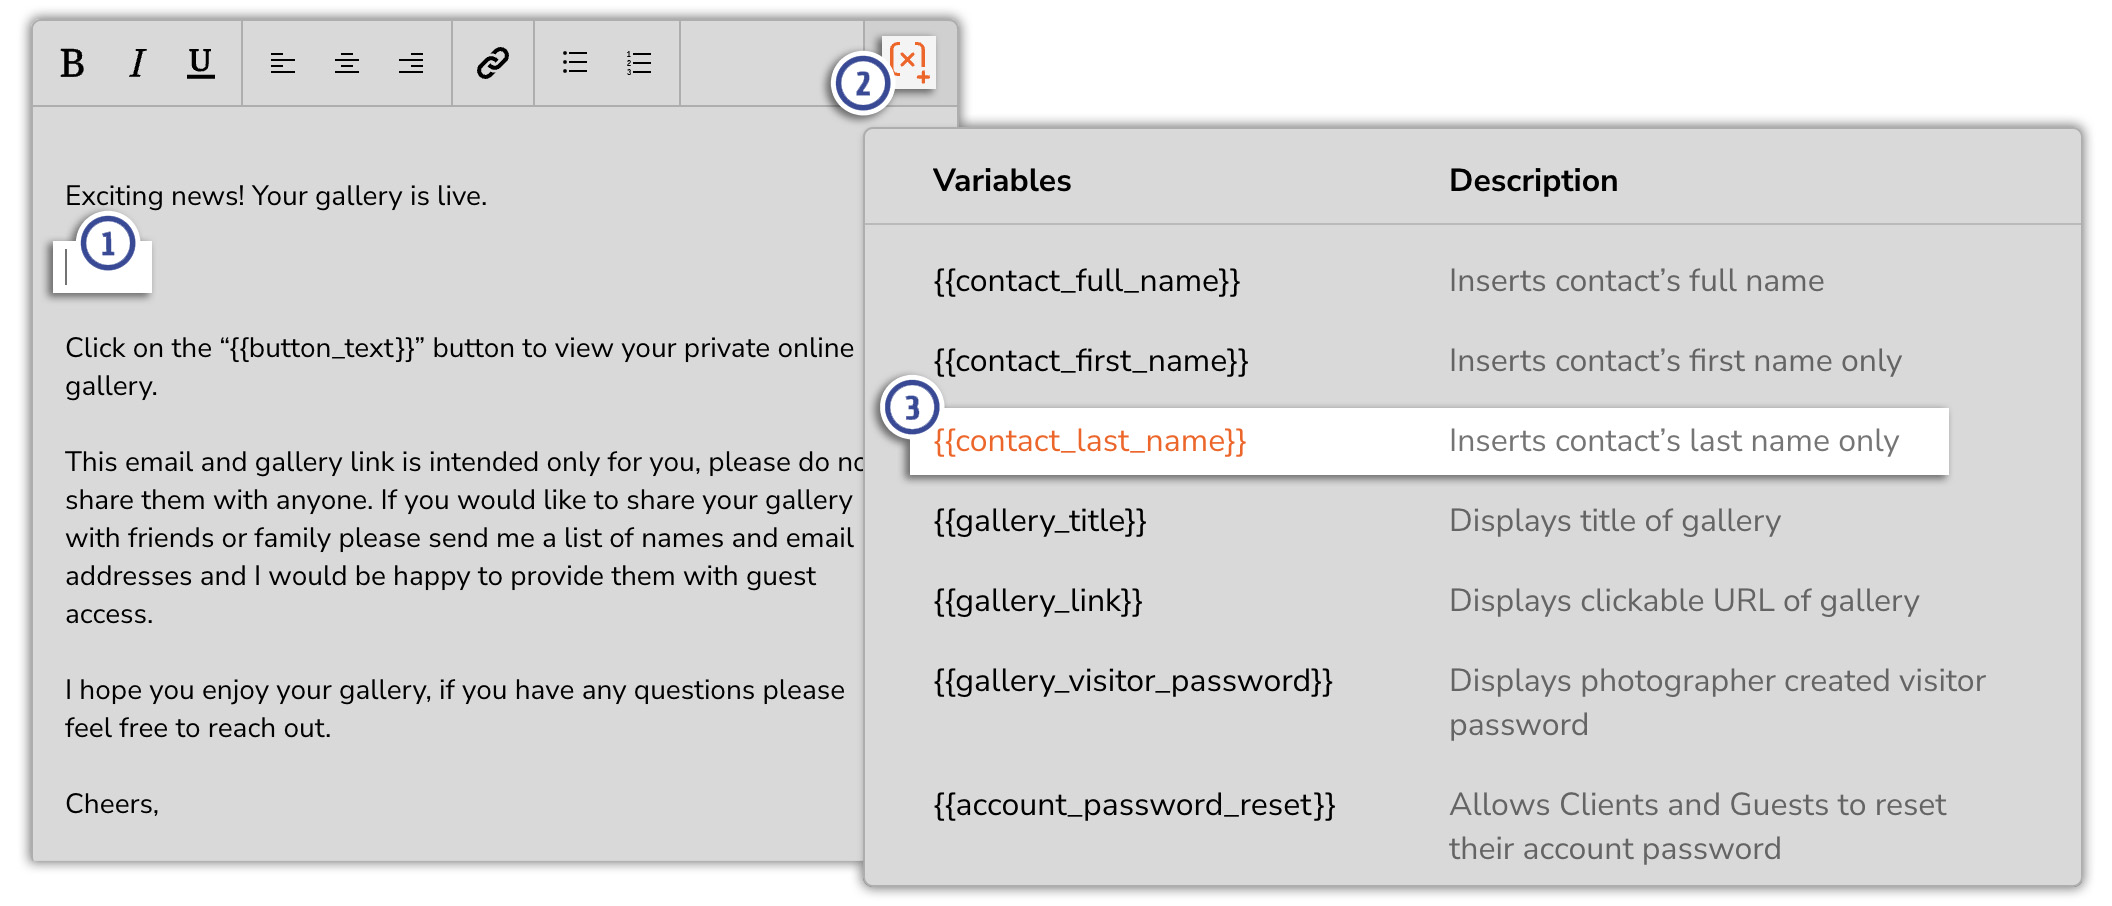
- To add a Variable into your Template, just place your cursor into the Subject, Headline, or Body where you want to put the Variable.
- Click on the
 Variable icon for this content field.
 - The list of Variables that are applicable to the content field that you're adding to will appear, scroll through the list and click on the Variable to add it where you've placed your cursor.

Here is a current list of the available Variables. Please note that some variables are only available in specific content fields. When you click on the Variable icon, you will only see those that are applicable to the content field you'd adding to.
| {{contact_full_name}} | Inserts contact’s full name |
| {{contact_first_name}} | Inserts contact’s first name only |
| {{contact_last_name}} | Inserts contact’s last name only |
| {{gallery_title}} | Displays title of gallery |
| {{gallery_link}} | Displays clickable URL of gallery |
| {{gallery_visitor_password}} | Displays photographer created visitor password |
| {{account_password_reset}} | Allows Clients and Guests to reset their account password |
| {{expiration_date}} | Inserts expiration date |
| {{days_till_expiration}} | Inserts the number of days until expiration |
| {{button_text}} | Displays the button text from the template |
| {{photographer_full_name}} | Inserts business owner’s full name |
| {{photographer_first_name}} | Inserts owner’s first name only |
| {{photographer_last_name}} | Inserts owner’s last name only |
| {{business_name}} | Inserts name of business as clickable link to website |
| {{business_address}} | Inserts business address as a clickable link to Google Maps |
| {{business_phone}} | Inserts business phone number as clickable link |
| {{business_email}} | Inserts business email as clickable link |
| {{website_link}} | Inserts clickable link to website |
| {{instagram}} | Inserts clickable Instagram link |
| {{facebook}} | Inserts clickable Facebook link |
| {{youtube}} | Inserts clickable YouTube link |
| {{twitter}} | Inserts clickable Twitter link |
| {{linkedin}} | Inserts clickable LinkedIn link |
| {{social_links}} | Inserts clickable title to all available social media accounts |
Using A Template To Share A Gallery
- In your account, click on the
 Galleries icon from the left-hand side.
 - Select the Gallery you'd like to generate an Email Invite for.
- Click on the Share button.
- Select Email from the dropdown button.
A new page will load where you will see the default Gallery Invite Email Template loaded automatically. See these instructions HERE about editing an existing Template, if you'd like to change the default.
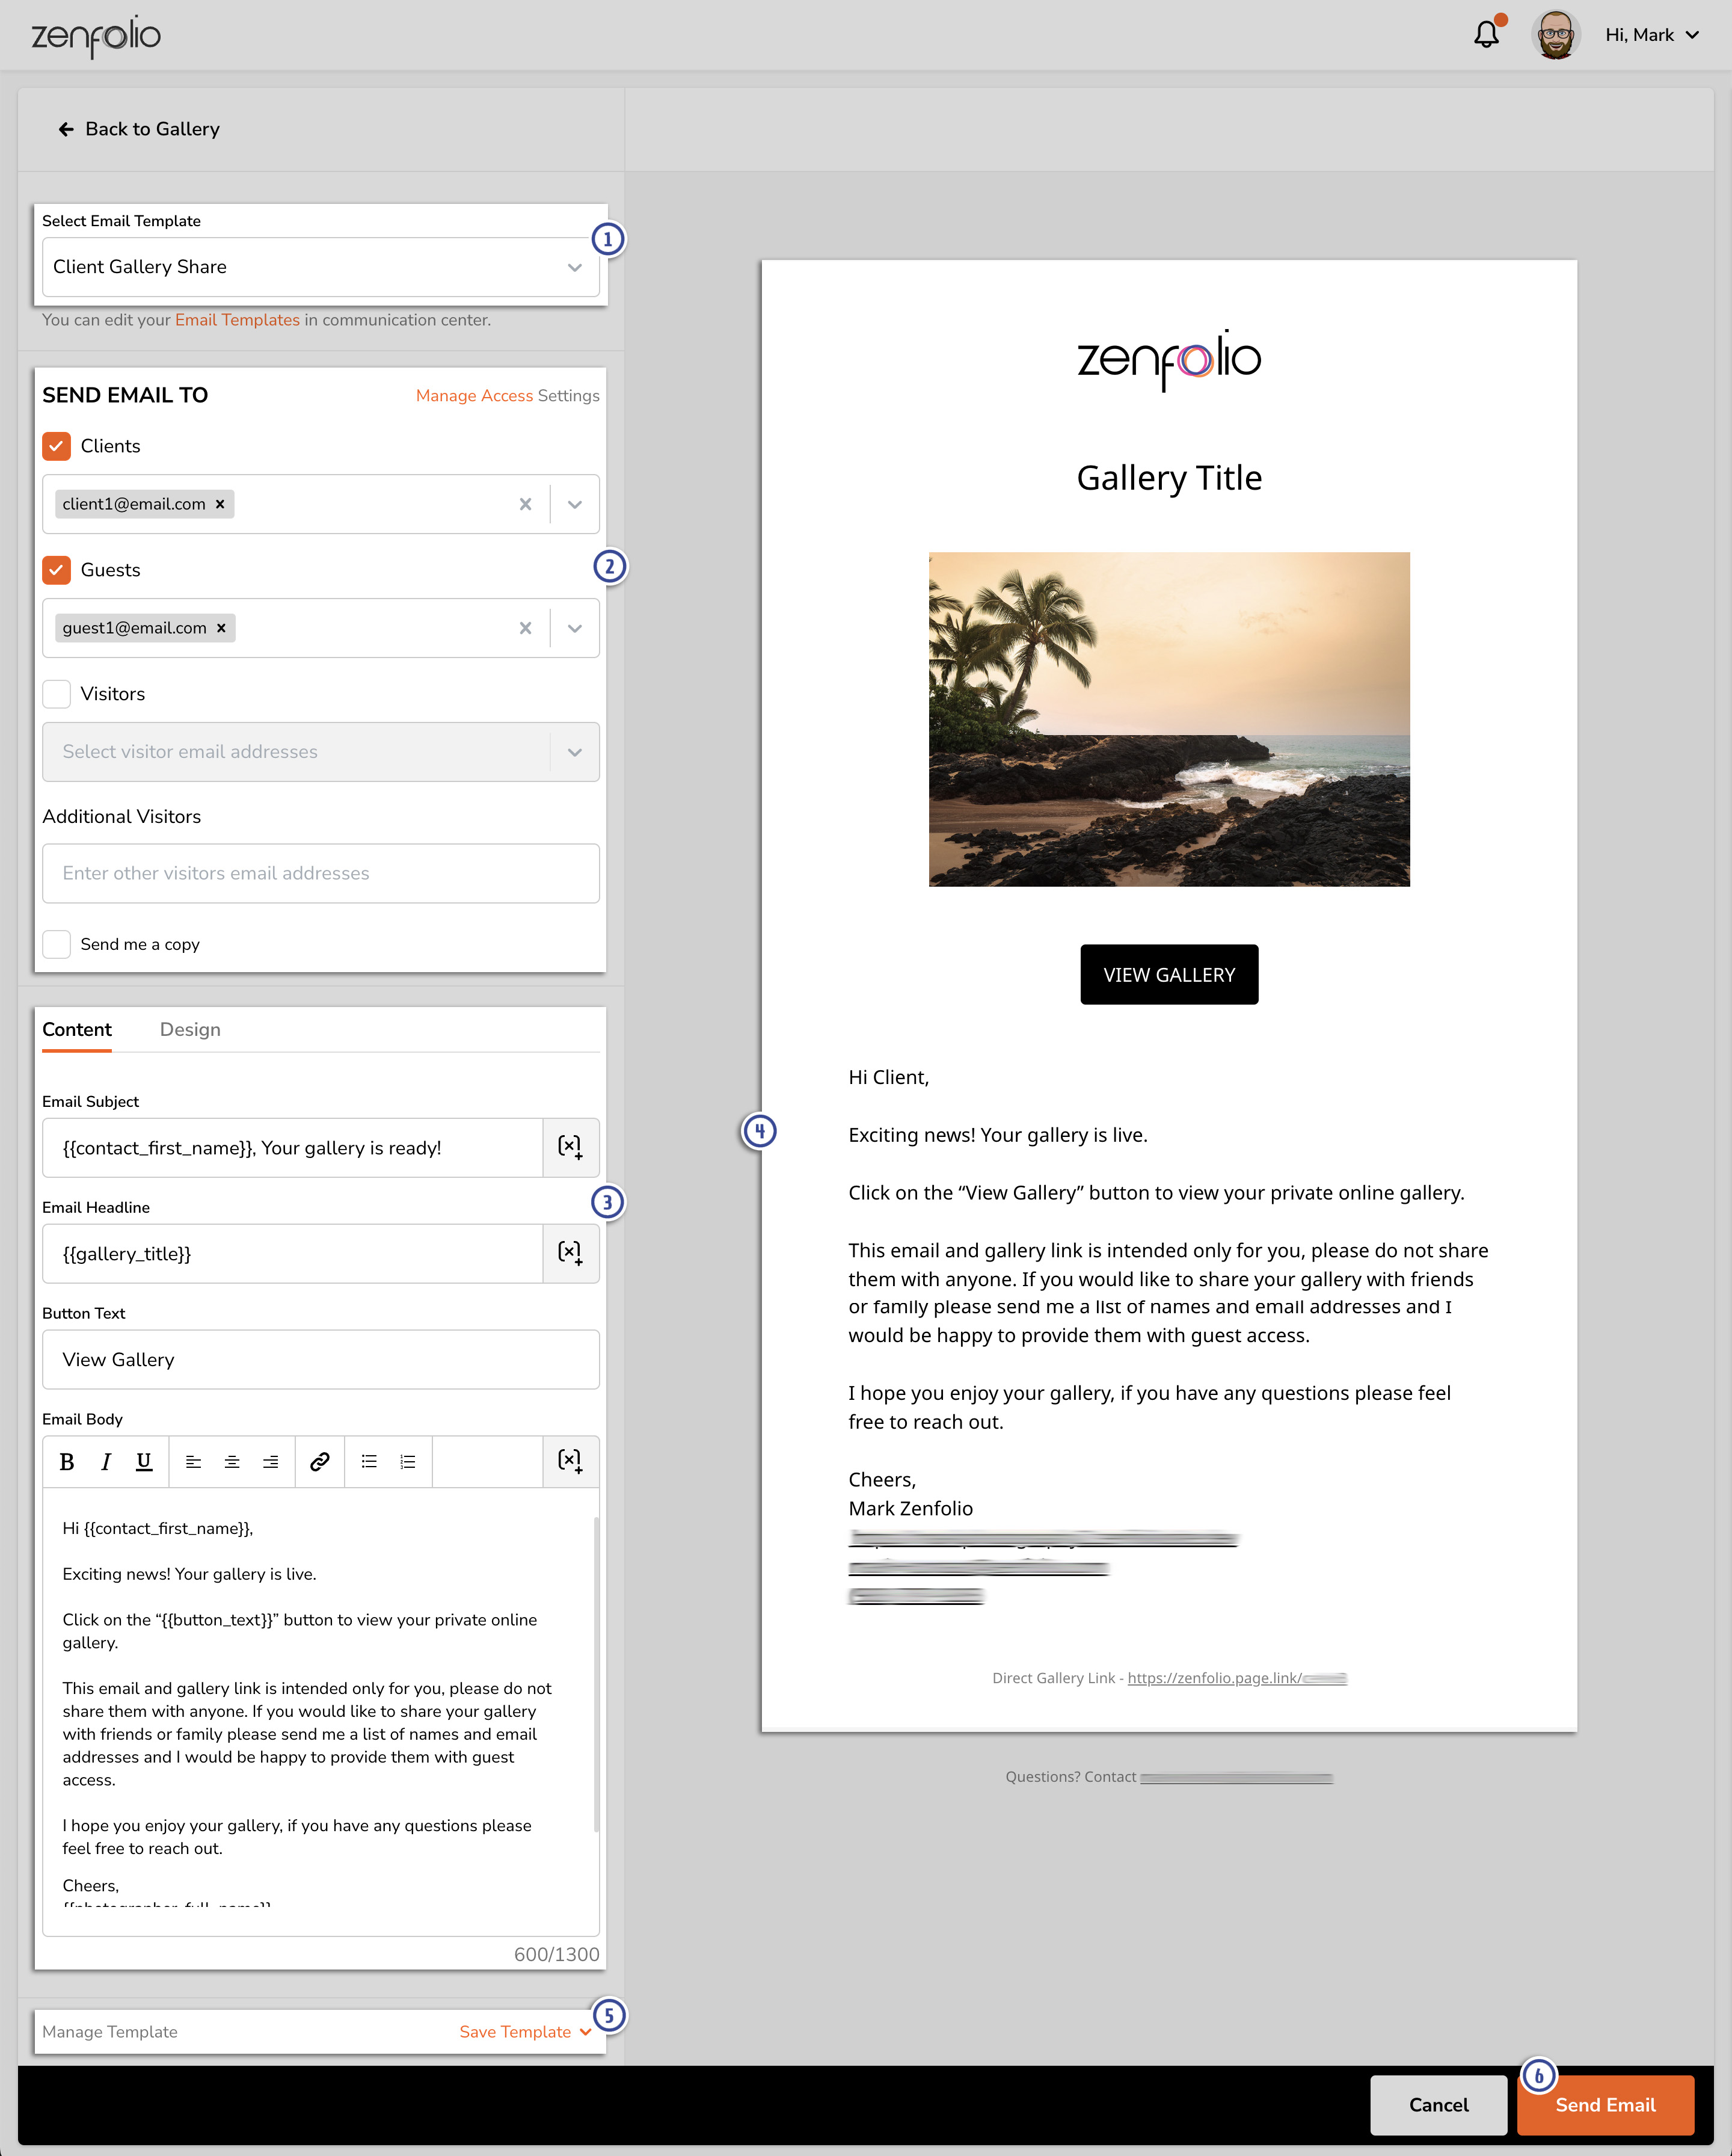
- In the top left-hand area of this page, use the Select Email Template dropdown to select which Email Template you want to use.
- Any Clients, Guests, or Visitors that have their email address already associated with the Gallery will automatically get added as the recipients of the email. However, you can remove any of these contacts if needed. Additionally, if you would like to send this email to someone that has not already been associated with the Gallery, you can add their email address as an Additional Visitor.
- You can then review the Content and Design of the email template that will be used. If you need to make any changes to this email, you can do so here. Click HERE to see the instructions in this article about using Variables, if needed.
- The preview of the email will update automatically as you make changes so that you can see a live preview of the email that will be sent.
- If you make changes to the Content and Design of the email template, you can Save Changes to replace the existing Template in your account, or you can Save as a New Template.
- Once you're happy with the email that is going to be sent, click on Send Email.
